New York 1776
"It was a gallant sight to see them, steadily, without a falter, March up the very steep hill, exposed to a constant fire of cannon and musketry, until they attained the sumit."
(American officer writing of Leslie's advance at Chatteron hill)

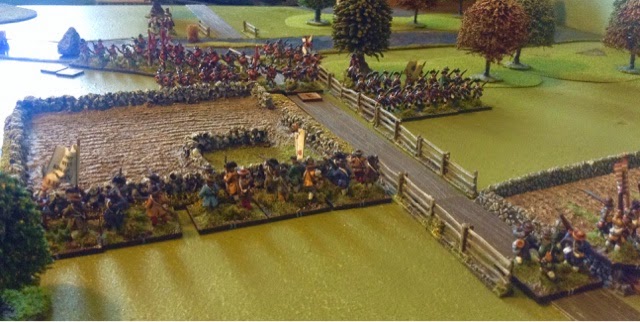
At the weekend my Dad and I re fought the battle at Chattertons hill using the scenario from the Black powder supplement REBELLION. We rolled for sides and I ended up in charge of the Rebel forces which consisted of Douglas's and McDoughalls brigades who were deployed on Chattertons hill. My Dad in charge of the British had 3 brigades made up of Rall, Leslie and Mattland who would enter from various points of there own table edge. Mattland had 6 guns deployed on the Wolf pit hill at the back end of the British table edge. We decided to ignore the 50% Broken army rule for this game and go fight on to see which side would control Chattertons hill at the end of the game. We also decided to use the pike and shot rule for broken brigades meaning once a brigade was broken, as long as a unit from that brigade was not shaken then it would not be forced to retreat and could continue fighting as normal apart from It's morale save would become a 6.

Maitlands brigade were the first to make contact with the Rebel forces, the Jäger riflemen and British elites exchanged fire with the Rebel riflemen forcing them back from there advanced position, the British Dragoons made a beeline around the flank and headed to the rear of McDoughalls continentals on the hill. I managed to get one unit of continentals down from the hill to take position behind the walled field to stop the British advance but after that the whole brigade sat for 3 or 4 turns without moving due to failed command rolls all the while coming under artillery fire from the British guns on the ridge.

The main British attack was taking place over on the British left. My dad opted to bring his troops on over the ford rather than crossing the river using a full move. I managed to get to levy mitia units in a good position in front of the crossing supported by the Delaware. The lead British regulars came under heavy fire over these turns and constantly becoming disordered they quickly became shaken, this some what slowed the Britsh advance. The Hessian brigade managed good command rolls and soon came onto range of the Militia taking refuge behind a stoned wall. A quick volley saw these wavering troops make a hasty retreat disordered back away from the Hessians!

The British guns on Wolf put hill, after finding their target in the opening salvos flattered to deceive for long periods of the game. I must admit I had feared the worst when my Dad was rolling 6 dice each turn for the artillery compared to my one artillery piece but it never proved to be a problem..thankfully for me anyhow

Back over to the British right the continentals started to win the fire fight with the British elites who along with the Yager and the Dragoons who were now far behind the rebel lines got a nasty surprise as a unit of militia about turned and unleashed a deadly volley into the horsemen,I must point out that before I rolled the dice I had just grumbled at the lack of sixes I had been rolling in my shooting, so I proceeded to roll 4 out of 4 sixes with my very next roll, the dice gods must have been listening :) with this the Dragoons became shaken and Maitlands brigade was now broken. Despite this sucess the continentals, especially the Maryland Batallion refused to obey their command roll and refused to move. Only the one unit of continentals moved across the fences to support the Delware unit which over the last few turns had become shaken and unable to rally, it was only a matter of time before I would fail a morale test with them.

After I failed to pull the Levy militia back to the hill with a failed command roll the Hessians took full advantage and charged the flank of the levy. Unbelievably the militia held for two turns before Been forced to give ground, this allowed me some time for the rest of the militia to withdraw back onto the hill.

The Delware finally had enough and fled the field opening up the centre of the American lines. The supporting continentals took a few rounds of British artillery fire becoming disordered which proved costly as I was unable to withdraw them back onto the hill. The Britsh line infantry were able to fire a couple of vollies into the these continentals and thus made them become shaken.

After breaking Maitlands brigade McDoughalls continentals failed their command rollto move as they had for much of the game. Because of this the retreating jäger managed to fire a couple of shoots at the Maryland Batallion as they were still in range as they retreated. This caused enough hits to shake the unit and deem McDoughalls brigade broken. Now all but one of the continental units would begin to retreat from the table leaving the militia to fend for themselves.

Now the game was at its critical point. The British 4th brigade had made an appearance but two failed command rolls saw them remain on the wrong side of the river. Tne British infantry pushed through the broken Rebel centre towards the hill, I managed at this stage to sucessfully do a follow me order twice in succession and move the one remaining active continental unit around the the back of the hill and deploy into line on top of it and fill the gap which had appeared. This proved to be a crucial move as this unit along the the supporting gun and NY militia unit who now had to stop hiding behind the hill and fight in the font line managed to break the British infantry command. However it was to cost me the continental unit and McDoughall himself as they were defeated in combat with the British line infantry, but they did manage the shake the British unit meaning the whole brigade was now shaken/broken and would start to withdraw.


In the final turns of the game the militia who had retreated from the first volley they had recieved in The Game had somehow managed to defeat a unit of Hessians in melee and also cause enough casualties on another to break the hessian brigade. However the third unit of Hessians was locked in combat and they managed to break the large unit of militia meaning Douglas brigade had now finally broken.

This proved to be the final turn (we had played around 15turns) as this had seen both our armies now broken. My militia were forced to start to retreat from the hill and although the hill was now unguarded my dads British and Hessian brigades were also now in retreat. Only the Hessian Grenafiers brigade were left to capture the hill but they had arrived to late in th day to make a difference. With this we decided a stalemate was a fair result, neither force could take or hold the high ground in their current state. I had been sucessful in halting the British Attack but I had suffered heavy casualties in doing so and had no strength left to hold the hill.

Absolutely excellent battle report. A real cliff hanger! Thanks for your efforts, inspiring stuff!
ReplyDeletedespertaferres.wordpress.com
Great batrep
ReplyDeleteGreat batrep
ReplyDeleteGreat batrep
ReplyDelete