Showing posts with label Blackpowder. Show all posts

Monday, 3 April 2017

Salem Church 1863


Time has been sparse at the moment due to a multitude of things so I have fallen behind in keeping my blog updated, so before I watch the last episode of the walking dead I have made myself a cuppa and with Robert plant live playing away on the sky box I am going to write up a quick report of the ACW game my dad and I played a couple of weeks ago. As the post title says we fought the battle at Salems church 1863 taken from the Blackpowder supplement Glory Hallelujah and of course using Blackpowder rules. We used the troops my dad has available so for the eagle eyed amongst my readers the Irish and Texans weren't present at the battle on the day but to make up numbers they would be this time, but obviously they were to be treated as regular infantry. Always one to be a sucker for punishment I decided to use the Confederates, with my first division been exhausted and only able to make one move a turn and been outnumbered by the union this would prove to be a tough ask. The game lasts for seven turns with the winner been the side who can inflict the casualties onto the other side 
 

How the armies looked on deployment, another division was to enter play on the unions first turn central behind the union centre. The wooded area on either flank would only allow a single move at half speed per turn, I put one of my exhausted brigades in the woods on my left flank hoping that I maybe able to outflank the union line.

My out flanking plan didn't quite materialise as a result of failed command rolls, a blunder and the half speed movement, they did become involved late in the game but 2 regiments from the brigade failed to get into the action, in hindsight I had wasted these troops.
The church in the centre of the battlefield was about as far as either of our lines got to each other as over the course of the seven turns the game lasted this open ground became a killing field in a deadly fire fight which proved costly to both sides
My reserve brigade from the second division, the plans were to wait till the fire fight had begun with the front line troops and reenforcements the line were needed, however as the next photo will demonstrate they were quickly needed else where on only move two of the game.
Yep a BLUNDER! The divisional commander cocked up big style and sent a full four regiments back two moves away from the front line leaving a colossal hole in my battleline, with my dads eyes lighting up at the prospect of the mayhem he could cause due to this action I had little choice but to commit my reserves to plug the gap, so much for plan A!

The fire fight rages across the battlefield

By the half way point it was clear that neither my dad or or I were going to be able to push home any advantage we thought we might have as both our front line troops were pretty shot up, this battle was turning into a battle of nutrition and who had the bigger balls to stand the longest under the heavy fire we were both receiving 

My first brigade of the 2nd division returns back to the front line to lend its support in the fire fight. I was unable or should I say reluctant to advance past this point as my dad had brought up the union artilley to cover his now retreating front line,  My rebs had already been shot up in the previous fire fight with the retiring union infantry brigade so to say the sight of them double gunned batteries was off putting has to be something of a under statement  ðŸ˜„

The fighting round the church briefly swung in my favour as the front line union brigade was broken, but unfortunately for me before I could press home my advantage my dads whipped troops remained were they were with a number of sucessful morale rolls and in turn broke my leading rebel brigade, this pretty much rendered this side of the battle a stalemate.

A second union brigade is broken but there was another full strength brigade ready to deploy in its place, however with only one turn remaining as was now 2-1 up on broken brigades, victory was in sight................
........But alas not to be as a second brigade broke under some withering fire from the boys in blue and by the end of turn seven both our armies had suffered the same number of broken brigades declaring it a draw.

This game turned out to be a desperate fire fight meaning it was a tough call for either side to claim a victory but more so I feel for the rebels, the way the battlefield is with the woods on either side led to our troops getting bottle necked into fighting through the centre as it would done in the real battle on that day back in 1863. It was still another cracking game from a period which is taking to me more and more each time I play it and definetly using the Glory hallelujah supplement helps to give a solid period fell to the game IMHO. 

Thursday, 22 December 2016

Why do you come to the land of the Zulu

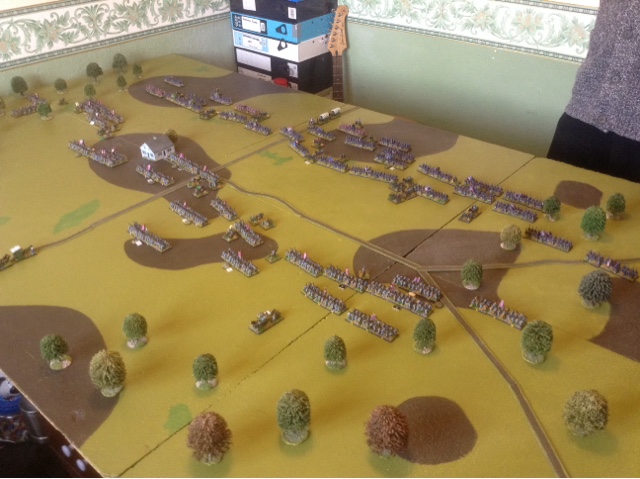
The massed ranks of the Zulu impi

Our last game saw us have our first game using my dads British and Zulu armies which had been his latest 10mm project. We used Blackpowder rules along with the supplement from the said rules. I took the role of the Zulus who had to intercept the two British columns which were heading towards the induna's kraal to destroy it. Five brigades of  Zulus started off table with the British in two columns deployed at the far edge of the table, I wrote down on a map the entry points for the Zulus and what turn(s) they would be appearing on. The kraal was situated on the opposite edge from the British with a crossbable river running across the table centre although it would take a full move to cross. I decided to have three of brigades of Zulus enter the battle on turns two and three hoping to catch the British  column off guard and attack them out of position before they managed to reach the river. The remaining two brigades would enter from turn 6 on the other side of the river.
The first of the British columns, 5 companies leave the camp and move towards the river at a slow pace with native light horse light horse scouting at the head of the column.
The first of the Zulus appear behind the hill as 4 regiments of Zulus threaten the flank of number two column 
British lancers and hussars are the first to cross the river at the forded area ahead of the foot columns who continued to make slow progress over the open terrain, it must be the heat slowing their progress
The British column behaves itself and adheres to its orders and forms into line on the crest of the hill, I announce the charge with one of my Zulu regiments and over come two volleys of closing fire although I did become disordered and suffered two casualties before crashing into the thin red line of British 
With the initial zulu regiment still locked in combat I announce two more chargers but they both fall just short of the British line. Another two brigades of Zulus now appeared behind the British columns. The British quickly reformed and some steady if not spectacular shooting kept the Zulus at distance disordered. The rocket battery also proved its use as some wayward rockets crashed around some startled Zulus who quickly became disordered when they were reading themselves for the charge.
The second British column finally reaches the river and starts its crossing, however this column was about to receive some company from their Zulu friends very shortly
The Zulus still tried hard to get into the British lines but we're finding it difficult to get past the British firing. The fight on the hill saw both units shaken but remain engaged and a regiment of Zulus was destroyed by some deadly British closing fire.
The British General oversees the back line defense and keeps the men in order as the Zulus are kept at a distance after a few dodgy command roll failures 
Another Zulu regiment is sent fleeing through closing fire but the fight on the hill starts to hot up as a second regiment manages to get into close combat and with the British company at the end of the line failing to disorder the oncoming Zulus, it's flank now looked dangerously exposed.
The second column comes under attack from the 4th Zulu brigade but some serious firing halts this attack with the Zulu regiments suffering as they attempted to charge over three moves ending up falling back disordered , although a couple of fluke pot shots by the Zulus manages to inflict some casualties on one of the British companies.
Back over at the fight on the hill saw mixed fortunes as the first of the Zulu brigades was broken finally after several rounds of combat as the British refused to give there ground despite taking heavy calculates. The British company with its flank Exposed was not so lucky as a regiment of Zulus was in inititive range and automatically charged straight into its flank.
The final brigade arrives for the Zulu reenforcements near the kraal itself lead by the induna himself and his bodyguard.
The Britsh company could not take the charge to the flank and was soon broken as the pursuing Zulus pursued deep into the British back lines, the fight on the hill was still stubbing continuing as neither side would give any ground. The Zulus had taken massive casualties and we're starting to get close to losing another two brigades which would see the army broken. The British 1st column itself was very close to been broken as it held on desperately in The face of the Zulu attack 
The second British column was finally charged and made quite light work of dispatching the remaining Zulu regiments of The 4th brigade as it became broken.
The arrival of the British cavalry back across the river saw the swift retreat of the broken Zulu brigade on the hill, the roaming Zulu regiment among the British formation found another flank charge into a company of British infantry but they were not supported as the Zulu regiment to the front of the British line was disordered, the final unit of Zulus able to charge manages to get past the closing fire but is badly shot up and disordered on the way in.
In the following melle both companies of British infantry hold there ground thanks to their steady rule and in the following turn they manage to shake the remaining Zulu regiments breaking the third Zulu brigade which saw the army morale broken. However the Zulu efforts didn't go in vain as they managed themselves to break the 1st column of British as another company had become shaken.
The Zulu warriors retreat away from the British lines defeated
Despite been able to break one of the British columns my Zulu army was broken and was ordered to retreat leaving the remaining British 2nd column and cavalry to advance onto the undefended kraal, leading the way to a British victory.
The game proved to be a very enjoyable encounter and played very differently from our other colonial games using the Mahdist forces. As would be expected if was very hard for the Zulus to get into the comfort of hand to hand combat, especially when announcing charges over three moves as the British get to do not one but two closing fires on you, this proved on a few occasions to be to much for for my Zulus who failed there morale test and were routed mid charge. Also the British with their stubborn rule were hard to kill, especially in this game as my dad always seemed to be sucessful in his reroll of a failed save,in fact he managed on a few occasions to roll really good saves when faced with the possibility of heavy loses in melees which could have proved disastrous on the break test. Another thing I learned was don't go any where near a rampaging unit of British lancers as a regiment of Zulus found out to disastrous effect when they strayed into charge reach..ouch!!

Saturday, 10 December 2016

Refighting the battle of Wilsons Creek ACW

                                                          'WILSON'S CREEK'
                                                            August 10th 1861
The Battle of Wilson's Creek, also known as the Battle of Oak Hills, was the first major battle of the Trans-Mississippi Theater of the American Civil War. Fought on August 10, 1861, near SpringfieldMissouri, between Federal forces and the Missouri State Guard, it is sometimes called the "Bull Run of the West."

The battlefield deployment (we used what troops we had available from my dads collection so some units in our game weren't present at the actual battle)

Wow what can I say about our Refight of Wilsons creek apart from that it was a crazy crazy game. From the off the tone for the game was set when my dad blundered with his second command roll of the game, I lost count of the amount of times we both blundered after this, one of my blunders even sent my whole brigade of 6 militia units charging three moves across the board to crash into the unsuspecting Union lines, this however proved to lead to my biggest sucess of the game. Failed command rolls were a common theme across the game,(even my flanking cavalry brigade failed their order to arrive on the table) with myself in particular suffering failed command rolls at crucial times in the game, particularly from my General  who had no authority over his men what so ever. My game plan of flanking the Union force quickly disappeared as my supporting brigade failed two turns of orders to move and was then charged in the rear by the arriving Union reserve brigade. But it doesn't stop there, I don't think I have ever played a game where the both of us have failed as many saving throws, it got to the point where when we saved one we give out an ironic cheer! Shooting dice were just as bad, my units in point blank range would miss with all there dice and my dad would in turn return the favour and miss, you couldn't make it up and until the later turns of the game I could just not roll a disorder hit! In the end we were both so close to breaking I decided to have one last hooray with my remaining infantry brigade and try and finish the unions off, I advanced into range and proceeded to miss everything, return fire came with a bang and all three units were shaking breaking the brigade and my army, quite a fitting way for the game to come to its conclusion after the events which had preceded this encounter. Despite it been a frustrating game at the best of times it Still was a good game to take part in and it literally went to the very last move of the game to find a winner, although no matter which side had managed to win the day , what was left of their army it was hard to think of it as a victory. Wilsons Creek you proved to be a very brutal scenario to Refight!

Two brigades of confederates ready to move onto the union lines
After two sucessful moves the infantry brigade on the right flank blunders and retreats back two moves, back to where they had started.
The confederate flanking force slowly advancing
The 2nd Confederate brigade failed to move in support of the flanking brigade as the union reserves entered the table directly behind their position
The militia guard brigade advance across the stream 
Despite the presence of the army General and three batallions of union infantry at there rear the 2nd rebel brigade still fluffed their orders, so the unions couldn't believe their luck and charged into the limbered artillery and the rear of the rebel infantry......
Only for my dad to proceed to roll the following dice needing 3+ to hit! (And yes the one saving throw I had to make I failed)
The militia decided against a fire fight and charged head long after a command blunder into the union units which had just advanced down from the hill line thinking they would be safe from a frontal charge
Things start to get up close and very personal
The blunder worked in my favour as the union brigade was broken after losing all the melees, the remaining union batallions were forced to retreat leaving a gapping whole in the union lines
After failing to arrive on the scheduled turn 4 the rebel cavalry sweeps around the rear of the union lines
With the arrival of my rebel cavalry I pushed my infantry brigade up to point blank range sensing I could smash the union resistance of the largest union brigade, once the smoke cleared from my volley firing I realised I failed to do this big style as all three union battalions were not shaken or disordered! 
The rebels on the right flank make their advance on the union defensive position.
The union return fire at point blank range and with the combined fire from the arriving union reserve unit the rebel brigade is crucially broken as I fail my morale saves.
Despite the loss of the infantry brigade I charged the rebel cavalry into rear and flank of the union infantry who could do little about it, these melees saw the union brigade of six battalions become broken but without my supporting infantry who had been broken in the fire fight I had no troops to move in and take the ground.
The final push sees me move my right hand brigade foward but my firing fails me as I am unable to break the union brigade, the returning fire sees all three battalions of rebels shaken and my army break point surpassed.
The carnage of the battlefield, a union victory but not to much left on either Side!