Saturday, 1 November 2014

ACW Regimental encounter

Finally I've getting around to updating my blog with last weekends game due to a few late call outs to work. We ran ACW fire and fury game, this time using the Regimental rule set. I decided to use the Union forces and my dad took the Rebs. 


Our units morale and stanima values are rolled for before the game at random, for the best part my troops were trained with the odd green mixed amongst them including my cavalry unit, my guns were crack and all my generals were rated excellent so would confer a +1 to my command rolls. My Dads Rebs had a couple of crack units mixed among them and a few more green than me. The Reb cavalry were crack and the guns were trained, the Rebel commanders were indecisive so would confer a -1 to their command rolls. Our forces started off table although we wrote down were each brigade would enter. The Mansions at each end of the table were classed as objectives as was the church in the middle of the board. Been in control of these has an effect on command rolls of your opponent.

Union troops enter the table and run to secure the church objective and to take control of the centre table.

Rebel forces enter the table in attack lines and head towards the union forces advancing at the centre line

More Union forces enter on the right flank to form a defensive line along the wood line and small farm yard, the troops defending the farm yard were green with a average stanima, the rest of the brigade were trained with one crack of good stanima.

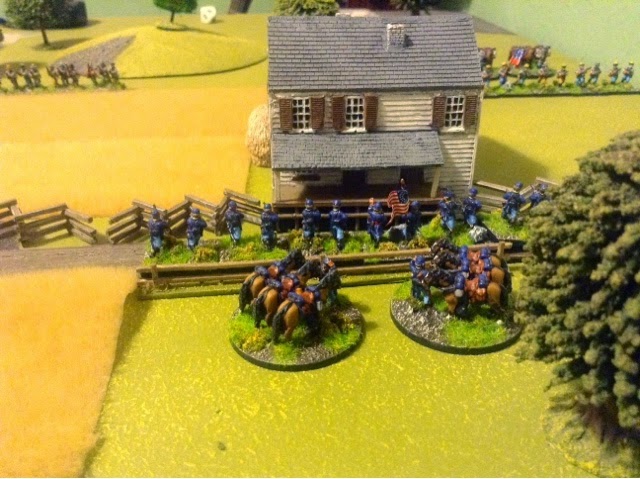
The union troops form behind the fence lines ready to engage in a fire fire fight with the advancing Rebs

The Rebes launch a strong attack against the union right and in particular target the green union regiment holding the farm yard.

The union cavalry beat there opposite number to reaching the mansion on the right and dismount and take control by occupying the building.

The Unions start their own attack on the right next to the mansion headed by a crack regiment, the Rebs take cover in the woods as a fire fight erupts across the fields.

The Rebel forces on the hill start to suffer heavy casualties on the hill in the face of heavy fire from the Union infantry and supporting artillery. 

Across on the right the Union crack regiment supported by a trained regiment make in roads and force the rebel troops in the wood to rout.

Seen the rebel forces taking heavy losses the union troops advance to point blank range on the alert flank. The Rebels on the hill are driven back but the regimentent of rebels in the wood are made of strong stuff and charge and drive back the attacking union regiment back across the crop field.

The Rebels charge into the green union troops holding the farm yard and make short work of driving the unit out in a spent condition.

The momentum starts to swing as the rebel Cavalry drive out the union cavalry from the mansion objective and secure it for themselves.

Spent, low on ammo and at a -1 morale the union regiment is destroyed after the Rebels follow up after driving them from the farm yard.

Around this stage my union forces had suffered enough casualties to pass their break point. Although thus does not end the game it does make you suffer when it comes to your command rolls, at this stage of the game I was at a -4 on the dice roll roll most of my troops, with these factors my entire right flank in the face of Rebs attack collapsed and all but my crack unit who retreated in good order turned tail and fled in dramatic fashion in one command phase, my right flank was finished as a fighting force. 

With my right flank in disarray my Dad started to turn onto my left flank towards my artillery on the hill and attack the churchyard. The Reb attack on the church yard was uncusesful and repelled, but two of the union guns were damaged as the the rebel infantry opened fire upon them.  The union crack guns still held their position though.

Not all was going bad for the union as I managed to break my  Dads right flank, as three regiments of rebels were broken in the attack meaning the Rebs had passed their break point to putting their command roll at a disadvantage. With both armies now struggling with command due to the minuses to the command rolls we had fought each other to a stalemate. Both our right flanks had collapsed and we had suffered almost the same amount of casualties so at this stage we called the game a draw.

The Rebel left flank at the end of the game, only the crack Rebel regiment in the wood remained.

With the union troops in full flight the rebel forces advance to take the ground on the union right.

A rip roaring game played to a bloody standstill. The collapse of my right flank was dramatic and really captured the feel of the rules.  Overall I really enjoyed using the regimental version of fire and fury.

Thursday, 16 October 2014

Latest French additions

First up is my very colourful completed 4th Cavalry brigade, 3 x regiments of Hussars, figures are pendraken  


Here is the start of the old guard (pendraken) with a 12pdr Artillery gun (Magister Militum)

The Great man himself Napoleon with a General and lady companion (magister militum) 


My artillery now with limbers, we have decided to base them with only the two horses to save space on the table and to keep them in proportion as they are only there as a representation (pendraken)

And finally a supply/ammo limber (magister militum) which has been tweaked from the original design by my dad to suit the scale of our games.


Eastern Front game

"Forward with me my comrades for love of the motherland not one step back"
..........  Or else..........
 

Our last game saw us fight a 550pt eastern front BGK game. I played the Russians and to say I took a complete battering would be the understatement of the year, the first turn went well as having the first turn I entered the table with no Germans deployed yet i was able to rush for some objectives, however that was about the only sucess I was to have. 

My Russian force, forward HQ, T34 platoon, SU-76 platoon, 120mm mortars, communication truck, 2x infantry platoons with Maxim MGs and anti tank rifles, Reece foot patrol, Sapoer Squad, Artillery Obsever and 45mm anti tank gun. I think the Germans force consisted of Forward HQ, supply truck, Reece Halftrack, Panzer IV platoon, Stug IIIG platoon, 2x Panzer Grenadier platoons with HMG supports.

Russian infantry dismounting from the T34s ready to secure the objectives.

Another Squad of infantry dismount amongst the crop fields ready to engage the on coming Germans.

German forces enter via the cover of the woods

This was around the time everything wants belly up fo me. During the next few turns my dad managed to pull an aircraft chit which duely arrived in the Shape of a HE-129B fighter bomber armed to the teeth. (I know the model is a Stukka but I don't have a HE-129 model) this plane caused havoc to my force unloading its bombs first and then strafing my infantry for 3 turns before its auto cannons accounted for my final T34. I did mange to hit it twice with some infantry fire but I couldn't keep it pinned for long. Also my dad drew a low on ammo chit which was played on a infantry squad holding an objective, with no ammo left and 3 squads of Germans approaching needless to say I would lose that objective. My dad also managed to draw a confusion and a beyond the call of duty chits before the game was out while I managed to at one stage pull 3 consecutive chits with the number 4, 12 points against my battle rating in quick succession. I did manage to pull my own aircraft though they didn't show and a low of ammo chit also, this I rolled a one for on the effect table so it did nothing to the German squad I played it on.  I really didn't feel it was to be day today ha ha.

The "ace in the sky" fighter bomber falls from the sky and drops its payload on to unsuspecting Russian infantry. 

As the Luffwaffe circle the skies Russian A/T units take shelter in the wood in ambush ready to engage the German Panzers.

Ura Ura, a Russian infantry platoon rushes the objective

Throughout the game true of the evenings form I came out badly in all the tank duels, the times I did manage to spot and hit the Panzers I failed each time to penetrate the armour, while my Dads German Panzers had little trouble destroying their foe, in particular with a long range shot after spotting a obscured SU-76 and rolling the two sixes required to hit on the dice roll, Panzer aces indeed.
My 120mm mortars offered little in the way of support, I found the target plenty of times but never once managed a direct hit and the pinning hits were very ineffective with the German troops been made of stern stuff and shaking off the effects of the bombardments without much fuss.

After a T34 AP round bounced off its hull, the command Panzer IV traverse its turret and sends the culprit up in flames with a well placed shot.

Russian communications instructing the 120mm mortar artillery support 

Running low on ammo the Stugs temporarily pull back to be re-armed from the supply Opel Maultier  

The Russian Sapper squad move through the cover of the woods to try unleash their flamethrower 

With the Stugs pulling back to be re-armed the 45mm A/T gun shows the rest of the Russian force how its done with a direct hit on the German Reccee Halftrack who just peeked a little to far from behind the hill.

"Where is my A/A gun support" .....After strafing the exposed infantry the fighter bomber switches targets and destroys the T34 taking cover behind the house and burning T34..... 

The final nail was truly nailed to the coffin with my last ditch attack to try salvage something from the game,lacking any armoured support now my brave Russian infantry decided to assault the Stugg holding the hill objective head on!  Well I should have said tried, one failed its morale test and wouldn't charge and the other although passing there morale come up short on the result chart as the tanks defensive fire repels the attack, both units pinned now in the mercy of he tanks MG fire now.

The Russian troops armed ith grenades and molotove cocktails fail to overcome the Stugs MG fire and are pinned down on the hill 

And that was that as a futher chit saw me pass my army breakpoint of 40. The arrival of the German fighter bomber was pivotal in this game with the freedom of the skies, it had my troops running for cover. it felt like my Russians had come armed with blanks for this battle and although I don't like to say it as it feels like an excuse my luck was rotton throughout.

Still I enjoyed the game evening if I did feel like throwing the dice out the window at times, but at £15 for the set I thought better of this lol.

The red army hordes will come again........this time with an anti aircraft truck or two!!!

Sunday, 5 October 2014

Derby world Wargames show

On Saturday we made the trip down to Derby for the annual wargames show held at Donnington race track. It's a show I look forward to as I know there will be definitely something which I'll buy and been a big show usually has plenty of games to view, also I was unable to attend Sheffield this year so it feels a long time since I have been to a show.
 Anyhow onto the day, after arriving just after 10am thanks to road works and 50mile an hour speed restrictions on the motorway the venue seemed to be busy with plenty of cars already parked up. Inside the trade was good, after a quick look round and managing to pick up a copy of Blackpowder for £15 our first stop was to see if Pendraken had brought our order down with them, which I am pleased to say they had. The order was for my Old Guard brigade with commanders and all the limbers I will need for my artillery along with 3 more regiments of Cuirassiers and some flags. Next up was Magister Militum were I bought myself a pack of 12pdr artillery and old guard gun crews along with a a packet of Old Guard Grenadier A Cheval to go with my Old Guard. I had to buy Napoleon while I was there along with Davout, Ney and Murat with a female companion and I also picked up a packet of Ammunition Wagons because they looked nice! I also picked up a few bits and bods for my German and American WW2 armies in the form of a massive Yagdtiger for Fall of the Reich games, a pack of two German supply trucks and a M10 Hellcat and a pack of Recee jeeps for my Americans. The jeeps as it turned out I have already bought earlier this year so i will have to stick them up on eBay!
There was no bring and buy this year (I knew this in advance) which was a little disappointing as you never know what bargains you might find. There was plenty of games but none really had that Wow factor. Derby games had a nice WW1 game, the figures had been excellently painted and I quite liked the old hammer fantasy game which had some vintage games workshop models and interesting conversions. Some of the WW2 games and the Vietnam game of Apocalypse now were nice and the AWI game with an attack on the fort was very pretty. However I was a little disappointed in the couple of Napolionic games I saw, not quite what I was expecting. I had a quick look around the competition games of which there was plenty but these really don't have any appeal to me, I just wanted a nose at the different ancient armies. 
At around 2pm we decided to head home, All in all the show was good and I spent plenty of money which is always a good sign for a show!

Wednesday, 1 October 2014

1809 Napolionic French v Austrian game


As I stated in post earlier in the week my Dad and I got a Napolionic Black powder game under our belt last weekend. Although my dad has played this period many times over the years including once owing a Austrian army in 6mm it is the first time he has played this period using this rule set, as for me I'm still getting to grips with the rules following a few games of AWI. The game was something of a feeler for the period using the Blackpowder rule set.

French infantry advance forward with cuirraiers in close support.

Austrian Grenadiers await the French advance in attack columns.

Over the first few turns my French made a steady advance across the table with the exception of my Dragoons who refused to move for two turns and a battalion of light infantry who blundered and veered to the right. The Austrians were the polar opposite and struggled to get moving, no more so than one of two blunders rolled on the opening turn which saw the light cavalry brigade not take to kindly to the sight of the French advance and turned tail and rode off from the battlefield. We decided on Ruling that they would be able to return a move later as it sermed abit harsh losing a full brigade because of a blunder while been restricted to your deployment zone. However if they were to be forced to withdraw a second time as a result of a future blunder then clearly they had no stomach for a fight and would be classed as lost. The main reason for the slow advance of the Austrians was a ruling my dad has used to represent the poor Austrian leadership. All successful command rolls of 3 moves must be rerolled, however if the reroll is a fail they are still entitled to make a single move. This happened during most of the time in the first couple of moves, especially hindering the advance of the Austrian cuirraiers.
With the Austrian Cuirassiers advancing towards my Chasseur Brigade I announced a glorious charge with my French Cuirassiers against them.....well almost as they fell a move short right in front of their Austrian counter parts!    

French Cuirassiers charge towards the Austrain heavy cavalry to protect their light compatriots but fall short.

The splendid retreat of the Austrian Hussars and Ulans! Just for future reference lads the French army is this way <---------- 

The Austrians had abit more success in moving their troops  in the next couple of turns. The Austrian Grenadiers took up a good defensive position behind the walls although they couldn't quite change into line formation and one regiment of Cuirassiers charged my Cuirrasiers with the other two regiments hitting home against my light cavalry. In the following combat phase despite some quite awful attack dice from my dad my morale throws were equally as bad and my Chasseur brigade was broken. The French Cuirrasier regiment lost and rolled a non to clever break test result and routed from the field, first success to the Austrians.
My French infantry engaged in a fire fight with the Grenadiers only managing to disorder a batallion and the 2nd infantry brigade moved into mixed formations sending their skirmishes out as they advanced towards the Austrian infantry and guns reaching the village in the center of the table. From this point they refused to move any further due to a failed command roll .

French infantry fire a first volley at the Austrian Grenadiers with little success.

The French infantry skirmish in front of the attack columns and lines

The Austrian battalions advance on to the ridge as the French advance stalls.

My Cuirrasier comander issued a follow me order leading a cuirrasier regiment into the worn down Austrian Cuirassiers who were close to been broken after their combat against my Chasseur brigade. After two moves of refusing to obey their commander the French infantry blunder their command roll, the result is a full on charge into the Austrian infantry lines (talk about one extreme to the other) Two of the battalions hit home, one of which was disordered by closing fire.  In the following combat phase it was mixed fortune for the French as one battalion was shaken but held its ground following its break test while the other battalion routed its opposition Austrian infantry. My French Cuirrasiers as expected broke the Austrian heavy cavalry brigade but suffered casualties putting it close to been shaken.

The French and Austrian infantry clash at close quaters as the French brigadier has a rush of blood.

In the following turn the Austrian Dragoons charge into the French Dragoons and after a couple of turns fighting manage to break the French Dragoon Brigade. Over on the left flank the Austrian Grenadiers have started to get the better of fire fight and have pushed the French infantry brigade close to been broken.

Clash of the heavy cavalry in the form of Dragoons on the French right flank.

My French Cuirrasiers loose their final point of stamina before I have chance to rally them with a pot shot from the Austrian Yager and with a failed morale save they become shaken, meaning that at the end of this turn my army would be broken. The Austrain grenadiers charged into a shaken Battlion of French Line infantry breaking them meaning a 4th brigade out of 5 was broken. The French infantry did have some success in melee and broke two battalions of Austrian line infantry but it wasn't enough to break the brigade.
Just to rub salt in the wounds the French Cuirrasiers failed their morale test as a result of finding themselves in support of the line infantry who broke from combat

As the French lines start to collapse the Grenadiers take the ground they won in combat.

Final positions of the armies as the game reaches its conclusion.

My French were in full retreat now and I had lost all my cavalry brigades and the game with it In the end it was a sound victory for the Austrians. Their cavalry proved the better on the day and even their light cavalry brigade had reached the fighting lines by the end of the game, finding themselves abit ofcourage in the face of the  French army retreating from the field.
Great game which left me with Plenty to ponder over, especially with cavalry tactics as loosing these three brigades pushed me over my break point. Maybe next time I should be a little more hesitant than wanting to get them into action to soon, as I found out with a stanima value of three they don't take to long to become shaken. 
It was a good game to open my first venture into Napolionic warfare and I'm already looking forward to  my Frenchs next outing maybe with a few new additions to their ranks :)