Time has been sparse at the moment due to a multitude of things so I have fallen behind in keeping my blog updated, so before I watch the last episode of the walking dead I have made myself a cuppa and with Robert plant live playing away on the sky box I am going to write up a quick report of the ACW game my dad and I played a couple of weeks ago. As the post title says we fought the battle at Salems church 1863 taken from the Blackpowder supplement Glory Hallelujah and of course using Blackpowder rules. We used the troops my dad has available so for the eagle eyed amongst my readers the Irish and Texans weren't present at the battle on the day but to make up numbers they would be this time, but obviously they were to be treated as regular infantry. Always one to be a sucker for punishment I decided to use the Confederates, with my first division been exhausted and only able to make one move a turn and been outnumbered by the union this would prove to be a tough ask. The game lasts for seven turns with the winner been the side who can inflict the casualties onto the other side

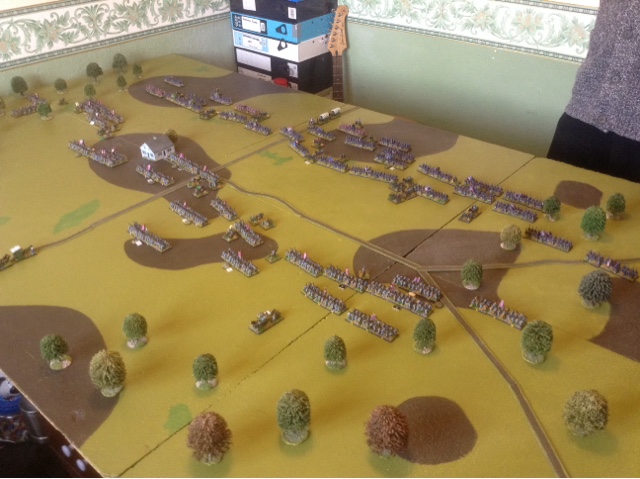
How the armies looked on deployment, another division was to enter play on the unions first turn central behind the union centre. The wooded area on either flank would only allow a single move at half speed per turn, I put one of my exhausted brigades in the woods on my left flank hoping that I maybe able to outflank the union line.
My out flanking plan didn't quite materialise as a result of failed command rolls, a blunder and the half speed movement, they did become involved late in the game but 2 regiments from the brigade failed to get into the action, in hindsight I had wasted these troops.
The church in the centre of the battlefield was about as far as either of our lines got to each other as over the course of the seven turns the game lasted this open ground became a killing field in a deadly fire fight which proved costly to both sides
My reserve brigade from the second division, the plans were to wait till the fire fight had begun with the front line troops and reenforcements the line were needed, however as the next photo will demonstrate they were quickly needed else where on only move two of the game.
Yep a BLUNDER! The divisional commander cocked up big style and sent a full four regiments back two moves away from the front line leaving a colossal hole in my battleline, with my dads eyes lighting up at the prospect of the mayhem he could cause due to this action I had little choice but to commit my reserves to plug the gap, so much for plan A!
The fire fight rages across the battlefield
By the half way point it was clear that neither my dad or or I were going to be able to push home any advantage we thought we might have as both our front line troops were pretty shot up, this battle was turning into a battle of nutrition and who had the bigger balls to stand the longest under the heavy fire we were both receiving
My first brigade of the 2nd division returns back to the front line to lend its support in the fire fight. I was unable or should I say reluctant to advance past this point as my dad had brought up the union artilley to cover his now retreating front line, My rebs had already been shot up in the previous fire fight with the retiring union infantry brigade so to say the sight of them double gunned batteries was off putting has to be something of a under statement 😄
The fighting round the church briefly swung in my favour as the front line union brigade was broken, but unfortunately for me before I could press home my advantage my dads whipped troops remained were they were with a number of sucessful morale rolls and in turn broke my leading rebel brigade, this pretty much rendered this side of the battle a stalemate.
A second union brigade is broken but there was another full strength brigade ready to deploy in its place, however with only one turn remaining as was now 2-1 up on broken brigades, victory was in sight................
........But alas not to be as a second brigade broke under some withering fire from the boys in blue and by the end of turn seven both our armies had suffered the same number of broken brigades declaring it a draw.
This game turned out to be a desperate fire fight meaning it was a tough call for either side to claim a victory but more so I feel for the rebels, the way the battlefield is with the woods on either side led to our troops getting bottle necked into fighting through the centre as it would done in the real battle on that day back in 1863. It was still another cracking game from a period which is taking to me more and more each time I play it and definetly using the Glory hallelujah supplement helps to give a solid period fell to the game IMHO.


Neil, you wuz robbed. A Confederate victory under the circumstances I think
ReplyDeleteI won't argue with that Colin ha ha
DeleteWhat a fab looking game, the mass of the 10mm look great, you have me digging that scenario out now.... impressed that you could get the Osprey Campaign book of 'that much' and get a shot the map, without bricks or some-such keeping the pages open :-)
ReplyDeleteThank you Norm 👍
DeleteHi Neil
ReplyDeleteLooks fantastic
Take care
Andy
http://www.10mm-wargaming.com/
Thank you
DeleteCracking game and a supplement I may look at at Salute.
ReplyDeleteThanks and its definetly a supplement worth buying
DeleteWonderful looking game!
ReplyDeleteThanks Phil 👍
ReplyDelete