Sunday 23 March 2014

A Sunday ACW Scenario

                                                  " PLATVILLE VALLEY"                     


The scenario was taken from an old Don Featherstone book and the rules used again are our own adaption of Command combat Civil War 1861.

The objective of the game was to control the valley which was set just off centre of the table, initial forces on the table were our Vanguard who were entering the table along the roads ready to make a early dash for control of  the valley, we wrote down the entry of our other 3 brigades who entered  the game around turn 3. I took control of the Union and my Dad was in control of the Rebs.

Both the Rebels and Union Vanguard advance along the road towards the valley


The Rebels reach the valley first and deploy on top of the hill

Union reinforcements arrive running in column to reach the centre of he field

The first real attack of the game saw my Union troops attack through the valley and engage into a fire fight with the rebels on the hill steadily getting the upper hand. 

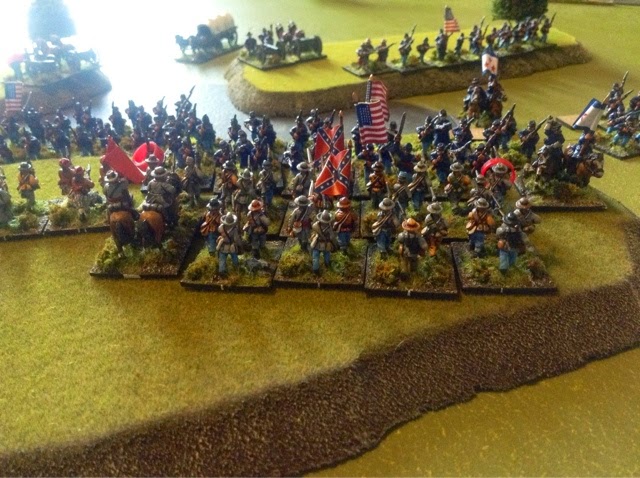
Rebel reinforcements troops head through the farm buildings towards the valley which was under attack from a large Union assault.

Holding the left flank with only battery of guns for support the Iron Brigade take refuge behind the picket fence in the corn field, the rebel forces attack in numbers but the Union veterans hold their own. 

Full steam ahead the Union assault goes forward. After winning the fire fight the rebel forces are forced back from the hill and the Union forces push into the vacated position. The Union 3rd brigade pushes forward to support the attack.

Not allowing the Union to have it all their own way the Rebels are pushed onto the offensive  by their CnC on Union right flank, the Texans charge into combat winning but failing to break the Union infantry, a second Confederate units charge is repelled from counter fire.

Far on the right flank dismounted cavalry troops engage in a skirmish fire fight in the woods, these woods must have been more like a dense forest as neither side could muster a hit!

Still the Iron Brigade remained steadfast due to some poor rebel shooting, they held the Confederate advance right until the final turn when they were finally forced to retreat back through the field.

Finally some fine Rebel shooting  had started to force the Union right flank back and  pushing forward they took the vacated ground.

The Union advance had stalled in the centre and while they were busy rallying the Rebels regrouped and charged back across the hill.

Heavy fighting along the valley, slowly the tide was turning in the favour of the Confederates.

YeeeHa ... The Union right flank starts to break as the Rebels start to turn the screw.

The final position looking across the table.

Time was up and after initial success my Union troops ran out of steam, the second half of The game had seen my Dads Confederates start to take the initiative.
I had been unable to get full control of the hill across the valley and now was been forced back onto the defensive. My right flank had been given a hard time and were beginning waver under the the Rebel attack. Luckily I had managed to draw two of the combats on the final turn, in turn managing to save my right flank and handing the Rebels what would have been a victory. 
In the end though the outcome was declared a draw, a very hard fought draw for both sides.


Wednesday 19 March 2014

Macedonians v Indians battle

Sunday evenings game saw us run our second game of Hail Caesar using our Macedonian and Indian armies. Our forces had additional personnel since our last game in he form of my final pike phalanx unit, two units of Scythian Horse archers and another unit of Thessalian and Thracian medium/light cavarly for my macedonians and my dads Indians had a division of Bactrian mercenary troops and also a Ox pulled battle wagon!
The battlefield had a river running through the middle of the board which to cross your troops had to be in open order.
I deployed both divisions of Pikes on my left flank along with the companion cavarly division and on the right hand side I had my Greek Hopilites and Thessialan cavarly division. These were to slow the Indian left flank down while my Phalanxs pushed forward to engage the Indian infantry as quickly as possible. Alexander was on hand to help these two divisions keep moving. My dads Indian Chariot division faced off against my Greek troops along with his mercenary Hopilites and a infantry division. Facing my Phalanx's were two divisions of Infantry with elephants and the war wagon.


The Indian army battleline complete with the war wagon under the watchful eye of Porus on top of his elephant 

The Macedonian Greek infantry Phalanxs and Peltasts march forward as one towards the Indian lines.

My new units of horse archers, they made a typical debut in that one was killed very quickly due to archer fire and the other struggled to find its shooting boots all game, still they look very nice!

The massed ranks of Macedonian pikes move at a good pace towards the Indian battle line under the command of Alexander , despite coming under heavy fire the Phalanxs morale stays strong

After destroying two units of Thracian light cavalry and retreating the other two the Indian chariots head towards the Greek cavalry on the hill

The Macedonian pike are well within charge range and use their initiative to charge home, the Indians loosened their bows inflicting damage onto the Macedonian pikes but they pass their morale throw to complete the charge against the Indian line.

The Hypastists make short work of the Indian infantry and supporting elephant and the pikes push back a unit of Indian infantry and destroy one, however the final Phalanxs, despite winning the combat failed to break the infantry and had left its flank exposed to be charged by a unit of infantry, sensing the moment Porus led the charge himself.

Thessalian cavalry retreat from the on coming chariot division who declare to charge but fail their order 

After a little reluctance on advancing forward the Greek Hopilites position themselves between the wood and river, the Indian mercenary Bactrian and supporting infantry and elephants advance slowly towards them.

After the initial charge was repelled by standing archer fire the companion cavalry charge home, the elite Hetairoi rode down the Indian infantry and charged into an elephant becoming disordered at the prospect of fighting it, however the unit of companion cavalry failed to break the Indian infantry and were routed in the second round of combat.

Seeing the flank about to be exposed the Macedonian foot general joins the combat, after three rounds of fighting and despite becoming shaken, the phalanx morale holds firm and finally make the Indian troops give ground, thanks to being able to wound Porus meaning I won the combat by a single point.

The chariot divisions charge falls short again after another poor command roll

The Indian battle line is pushed back far from the hill closely followed by the Macedonian phalanx pike.

After surviving the flank attack the two units of Phalanxs withdraw to rally some points back from their stamina ready to fight again.

The end of game,despite making good ground and been very close to breaking a couple of Indian divisions on my left flank I had ran out of time. My dads chariot division just couldn't get the charge which I'm sure would have broken my medium cavalry division, so at this stage with neither side managing to break any of their opponents divisions the battle was called a draw.
It was a good game again and I'm really liking wargaming the ancient period. Im also enjoying using The Hail Caesar rule set especially now I'm starting to get to grips with the rule set, although I must remember the special rules for my troops, I forgot that my medium cavalry are drilled and the Companions are elite in this game!

Sunday 16 March 2014

Volkssturm infantry for the Fall of the Riech underway

Here are the first of my Volksstrum platoon I will be using for Battlegroups the Fall of the Riech supplement. The models I purchased from Peter pig and includes a infantry squad, HMG, and command squad


Wednesday 5 March 2014

Back to the eastern front


The weekend saw us return to the eastern front for A  500 point Battlegroup Kursk game. Featuring three objectives, two of which were a village in either sides deployment zones and a train station in the middle, the side who controlled all three would win the game. I took command of a Russian infantry division and my dad picked a Infantry based force for the Germans with a platoon of Stugs and a 88mm for good measure.
My force in the picture above included a platoon of infantry with an additional squad and anti tank gun, a reccee foot patrol, sniper, 82mm off table mortar battery, HQ, Observer, KV2 and a supply wagon and a KV1 platoon and a priority 5+ additional artillery.
My break point was 29 and the Germans around 40. 
The game saw us both hold our village objectives throughout the game and tussle over the train station, initially the Russians held it but were forced to withdraw under heavy German fire. Although the Russian armour started to edge the duel against the Stugs my infantry suffered heavy losses towards the later stages of the game from some impressive German MG fire and put me on the brink of defeat. The final blow came when a well placed 82mm mortar round landed directly on top of my 45mm anti tank gun knocking it out, the following morale chit saw the Russians surpass their break points so the Germans took the spoils comfortably in the end.

Here are some photos of he game,

Civilians file past the rail station as the German forces arrive

A Russian KV-1s and supporting infantry squad pass through one of the villages

A Stug III enters the game, ready to use its reserve move to push forward. 

The deadly 88mm quickly deploys to cover the rail line and readies itself on ambush fire

Russian Partizan troops (i use them as my reccee infantry squad) scout ahead to try reveal the German positions 

As the 45mm anti tank gun deploys the KV-1 and infantry squads rush towards the train station

After using its reserve move to get into a better position the Stug III fires a round or two at the KV-1 causing it to explode into a ball of flames

German infantry arrive from reserve and pass the windmill with a Stug III in support

The German infantry command squad contest control of the station after destroying the occupying Russian infantry

After using its reserve move to flank th KV-1 the Stug III cores a hit but only pins the KV-1. In the following turn I used a tactical co-ordination with my HQ to sucessfully un pin the KV-1. A fire and move order later The Stug was on fire and the KV-1 was in reverse heading for safety before the 88mm could avenge the Stugs destruction.

After a back and forth fire fight with a Stug the massive KV-2 out of ammo is reloaded by the ammo wagon ready to continue the fight

Seen the Stug also been reloaded a KV-1 sneaks through the corn field to take a shot at the rear of the German tank, a direct hit results in the Stug becoming immobilised.

The game ending direct hit from the German 80mm mortar round destroying the anti tank gun with a direct hit.