Tuesday 23 February 2016

Our first dabble at sword and spear rules..

            "So how do we go about conquering India now with these new rules?""

After reading a brief review in the MW mag and liking what I had read I recently bought the Sword &Spear rules set, so my dad and I after having read the book we decided to play test the game using our Indian and Macedonian armies. We each picked approx 500 points from the lists provided which give us between 17 - 22 units aside and got stuck into the action.

The set up, not as big as our Hail Ceaser games but there was definitely enough troops for a night game

The Macedonian Pikes are classed as large heavy foot so each unit represents 3000 men 

The Indian elephants smash the poor Rohdian double handed weapons unit, the elephant unit represents around 100 of the things!

The most challenging aspect of these rules was how to activate your command dice, a dice for each unit is placed in a bag (this game the Macedonians were red dice and Indians were yellow) and 7 are drawn at random. The player with most of his colour dice drawn holds the initiative and rolls these dice to see if he can activate any of his units comparing the dice roll to the units discipline rating. If you equal the score you can do basic activations, above allows you to do more difficult manoeuvre and charge and anything below is a failure and the dice is discarded, Then the opposing player goes through the same procedure with his drawn dice. Once this has been done each player activates a unit in order of the lowest dice score rolled on each discipline test until all the units have been activated, then you take another 7 dice from the bag and repeat the process until all the dice have been used at which stage you place all the dice back into the bag removing any dice for destroyed or routed units and repeat the process. All actions are carried out when you activate a unit, e.g if a unit charges you fight the combat immediately. This is what I liked about these rules as you didn't have to wait to your opponent finished all his movement/shooting etc before you could do yours, you were constantly involved in each phase as its not going to be often that 7 dice of one colour is drawn. (Although when it does happen oh boy things will go badly for you!)

Macedonian Companion and medium cavalry clash with the Indian horse and heavy chariots 

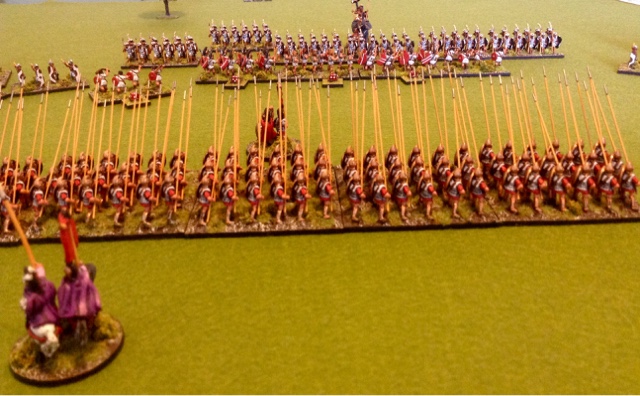
The Macedonian pikes charge up hill and smash into the Indian mixed archer units.

The melee and shooting was straight forward enough with a number of dice rolled by each player depending on the unit strength with bonus dice for been fresh, impetus, flanking etc, the top 4 dice score are pitted against each other, beat the score by more than double and you score a hit on the unit, less than double requires a discipline test which if failed causes a hit,equal and under is a fail. Armour values can alter a dice score in your favour. Once a unit suffers casualties equal to the unit strength (usually 3 or 4) the unit routs and is removed with any friendly units within a certain radius required to make a discipl test. We found that once the Macedonian troops got into melee that they held the advantage were historically they would have, and the Indian troops would be struggling to beat them, especially if those Phalanxs were fresh were they come into there own. However although you don't become disordered as in hail ceaser from shooting hits, casualties take there toll and we found out a few times the importance to rally the units before they get to near there break point. Also the potential is still there to cause the Macedonia troops some problems with the amount of fire the Indian army can unleash,although in this game at least it certainly wasn't as effective as it has been in hail ceaser games.

This is where we found the Macedonians at there most formidable, hand to hand combat.

Commanders have a important role to play to, having your units out of command can be a pain when it comes to discipline tests and they are also helpful to rally, although you have to be careful were you deploy them as they can be targeted..and those Indian troops still have lots of arrows to shoot!
So as the trial game came to a close ending in a draw with the Macedonians starting to get the upper hand, both my dad and I had really enjoyed the game. Definitely a lot different to hail ceaser and I certainly felt the Indian army was not as powerful as at times it can be in Hail Ceaser. Having said that the Macedonian army still can be vulnerable to been out flanked as those Phalanxs are slow and clumbersome. the game mechanics make the command of control so important and this is the main challenge, definitely a good challenge as you have really good think which troops you need to activate first. As expected we made a few errors along the way but after this trial game and another study of the rules I feel a lot more comfortable going into future games, oh and for the eagle eyed of any of you who regularly read my posts might have noticed the table top looking different, this is because my dad has just purchased a new battle mat from the Cigar box company who produce a number of different battle mats, it looked and felt great, definetly a good purchase Dad :-)


Saturday 20 February 2016

In a Galaxy Far Far away......

Last nite i managed to twist Catherine's arm into having a game of X wing so i could get to use my new space mat ive just bought. I was very pleased with the look of the mat once we got the models onto it and it definetly helped the bases of the ships have something to grip to. I picked a couple of forces with a couple of upgrades, the Empire had Darth Vader in my new Tie Advanced and the Rebel force had Luke Skywalker and also included my latest purchase of a B-wing fighter.

The Empire force, two T-fighters, Tie Interceptor, Darth Vader Tie Advanced
The Rebel force, Y-Wing, B-Wing and Luke Skywalker X-Wing Fighter
Catherine decided she wanted to be the good guys so i took the role of the Dark side. The object of the game was simple, to destroy all your opponents ships! However to achieve the primary objective i need to keep Darth Vader alive and Catherine needed Luke to survive the game to claim a all out victory.
The opposing spaceships move into position to attack
Some rather deadly dice rolling saw Luke Skywalker become the first casualty as he was critcally hit three times meaning evening R2D2 could not repair the somewhat battered X wing. My luck continued as Darth Vaders Tie advanced somehow managed to survive the game despite been hit by everything the Ywing and B wing could throw at him (the force was strong with the Empire dice this evening). Eventually i managed to destroy both the Y and B wing fighters and win the game but although i hadnt lost a ship both tie fighters and the interceptor where down to their final hit point so the game was a close one. We had alot of fun playing the evenings game and that was despite at one stage suffering a powercut (thanks Nothern Grid for texting us to say we will be suffering a short power cut after we had already lost the power, the pre warning was appreciated!) and playing under candle light for a short time. Next time i will be taking a Rebel force probably using the millenium falcon so Hans can go and search for his buddy Luke whos downed X wing has been detected on a planet in the Imperial sector :-)

Lukes X wing is downed from Vaders torpedos and combined tie Fighter fire

A Tie fighter hurries to Darth Vaders rescue as the B-Wing tails his Tie Advanced destroying its shields

the Tie Interceptor gives chase to the Y wing
the battle rages as the spaceships circle to attack again
Darths luck continues after somehow surviving the close range laser figher from the Y & B wing fighters who have target locked the Tie Advanced
the games up for the Rebels as the interceptor scores its second kill destroying the Y wing

Monday 15 February 2016

A Napoleonic love affair on Valentine's Day..

                       "Napoleon and generals accompanied by the old guard"

On Sunday my dad and I travelled up to Robbie's house to have a rather large game of Blucher using Robbie's lovely 6mm French and Austrian armies which he has been busy rebasing over the last few months. Even though Robbie still has vast amounts of Napolionics to rebase we still comfortably had enough units for roughly 500 points aside. Paul traveled over from Whitly Bay to join in the game and took command along with with my dad of the Austrian army, while Robbie and myself took command of the French.

Day light shines across the battlefield as the opening exchanges of gone battle unfold
Our Battle plan was for Robbie to advance and hold the Austrian right left flank along the ridge while I pushed forward a large attack in the centre, this was to be supported when required by the French reserve heavy cavalry, I was also going to engage the Austrian left flank to stop the Austrains from being able to reinforce  their centre to easily. We kept the guard Corp in reserve just in case any cracks appeared in our battle-line.

The first wave of French brigades march towards the Austrian centre....


Throughout the game Robbie managed to throw a succession of low Momentum dice for the Austrains  so Paul and my dad struggled to really get any kind of attack launched against us handing us the initiative. As the game progressed,our centre after getting the better of the earlier fire fight charged into the Austrains and started to push the Austrains back in consecutive moves,destroying a couple of brigades in doing so.

The Austrian right flank retreats under pressure from the French assault as a massed battery is over run by a French line brigade.

The French right flank under attack from Pauls Austrains, the action around this area sees some hard fighting around the woods and town.

My French Corp in the centre breaks through the Austarain first line and engages the supporting Austrain brigades
.

Paul and my Dad study the battlefield, deep in thought wondering if they should have another biscuit with their coffee:-)

Austrain Currasiers and horse artillery move around the French left flank

The Austrains hold the town as the French fail in their attempts to dislodge the Austrian garrison.

With the Austrain centre under sever pressure as Robbie committed the reserve French cavalry, my dad was forced to send his reserves over from his right flank,across the bridge and river to stop the centre from collapsing.

The French currasiers and lancers go to support the attack on the centre of the wavering Austrain line.

A brigade of Bavarains garrison the town 

The fighting on the French left flank continued all day with neither side being able to make a telling break through.

The Austarin reserves cross the river to support the centre.

A grand sight indeed as the French Guard corps moves into the action.

The Austrain centre has now been pushed right back as the French line brigades move into the positions once occupied by the Austrains.

With my dad having to commit the reserve infantry to stop the centre from completely collapsing I activated the guard Corp which advanced quickly to engage the now weakened Austrain left flank. With this and the arrival of the French cavalry in the centre, my dad and Paul both felt the game was beyond the Austrains now and all that remained for them to do was to form a final defensive line to start to withdraw. We had managed to play for around 4hours with a break,for lunch (cheers for the chilli Robbie) with very little interruption for the need to check rules. This is the first time we have played  a multi player game using Blucher and I felt that the rules worked excellently, especially as we seemed to get a lot of moves and action in the time we played, and visually the game looked fantastic! I hope everyone else enjoyed the game as much as I did although the dice certainly favoured the French in this game (I've never known my dad miss so much with his artillery). Hopefully we can have some more  multi player games in the near future. 

The battlefield at the conclusion of the game.

Tuesday 2 February 2016

A improved Macedonian performance...

Last weekend so us go back to ancient times with a hail ceaser game using our Macedonian and Indian armies. As anyone who reads my game reports knows I don't have any sucess using my Macedonians and normally end up having heavy chariots and elephants rolling up my flank due to my army losing all order as I fail command rolls with an alarming regularity! Also the wall to wall bow fire the Indian army hits you with is a scary prospect and my battle lines usually ends up been badly disordered. With this in mind I decided to use my army differently than normal, instead of just skirmishes shielding my phalanxs I decided to use the peltasts in this role too, with the intention of covering the ground in as short as time as possible (obviously command rolls allowing) where I could bring to bear my javelins before closing into combat. No doubt I would end up losing these units but if it ment my Phalanxs got into combat basically fresh it would be a worthy sacrifice, and just maybe it may cause enough casualties on the Indian infantry to shake a division? I deployed my troops as my dad had scetched a map of his deployment as below,

The outset of the battle saw the armies take to the field on a very open terrain,much to the Macedonians liking!

Macedonian Companion and Thessalian medium cavalry are deployed on the Macedonian flank

Indian cavalry,light and heavy chariots deploy on the opposite flank to my cavalry

With my cavalry been deployed on the opposite flank in my opening turns I moved one of the cavalry divisions round the back of the infantry to cover the left flank of my hoplite Phalanxs, to protect them from the Indian cavalry and chariots. Despite the odd failed command they repositioned in relativity quick time thanks to been drilled and always been able to make a move when a order is failed. My infantry divisions both moved forward although the Greek Hoplites moved at a angle to stay out of charge range of the cavalry and chariots, (although this would not have been a problem as the chariots spent much of the game failing their movement orders thanks to a blunder roll by my dad early in the game.)

My deep formations of infantry face off against the long lines of the Indian infantry

As I had planned I sent forward a line of peltasts and slingers to engage the Indian infantry. Initially I was successful as the peltasts caused casualties and disorder among the Indian troops. My dad started to retreat his line at this time to escape the javelins and initiative range and continued to pour arrows into my peltasts. Although I was losing casualties I was still achieving my objective of protecting the Phalanxs as they advanced just behind.

Peltasts and slingers in the initial first clash with the Indian archers.

Massed Macadonian pikes in support wait their time to charge

Over on my right flank I had sent some Thracian light cavalry around the flank of the Indian elephants where they harried them with javelin fire before routing the supporting Indian javelin men.  I was able to keep these elephants occupied for much of the game with the ability to keep evading when charged by the elephants before returning to javelin range again the following turn.

The Indian elephants come under javelin fire

The battle continues in the centre with the Indian archers and the opposing peltasts 

Over on the Indian right flank the chariot and cavalry division blundered for a second time and went charging ahead a full three moves. This made them charge my companions and Thessalian cavalry who countercharged. I was able to defeat the over enthusiastic Indians and repell the attack with out my cavalry becoming shaken or broken which was a big bonus. The Hoplites after losing their skirmish screen charged into the Indian infantry over coming closing fire with out any disorder. Despite been out diced the Indian troops somewhat surprisingly stood their ground and held the Greek troops in melee (thanks to some woeful attack dice by me and some inspired break tests from my dad). However I had my own luck as a Hoplite Phalanxs somehow survived been hit by heavy chariots to the front and flanked at the same time by a unit of infantry. My dad rolled some shocking dice and I was able to hold my ground with a successful breaktest, and to really rub salt in the wounds the division leader who issued a follow me order to the infantry was seriously wounded after I rolled the required double 6! In the following turn I issued a follow me myself onto a unit of Thessalian cavalry who charged into the back of the flanking Indian infantry, this charge saw the Indian infantry break and the chariot give ground as my Hoplite infantry survived.

The thick of the action between the Mercenary Hoplites and the Indian infantry.

Back in the centre my peltasts infantry had been broken but they had managed to cause a few casualties on the Indian foot troops as well as shielding the Phalanxs from arrow fire. However this is were my plan stalled as I had a succession of failed charge orders with the pikes (until very late in the battle) as I was unable to get them into combat with the bowmen. On my right flank my second cavalry division was engaging the elephants and isolated Indian javlinmen.

Thessalian cavalry engage with the Indian elephants as the Phalanxs advance grinds to a sudden stop

The Greek Hoplites were now starting to finally get the upper hand as the Indian archers finally started to break, although a couple of units had become shaken in the process.

The durability of the Greeks proves to much for the Indian warriors over the course of the lengthy combat

Another fine morale test by my dad saw a unit of Indian archers somehow hold their ground despite been faced by two Macedonian Phalanxs, while the rest of the Indian infantry division reorganised itself into a organised battle line awaiting any break through by the pikemen.

The massed ranks of Macedonians make hard work of trying to defeat the Indian archers

With our time up we declared the game a draw. My Macedonians were definetly starting to get the upper hand and victory was definetly in my grasp. Although my new tactics worked reasonably well and I couldn't grumble at my command throws as I didn't fail to many, I feel a big factor in me gaining the upper hand was the inability of my dad to get his chariot and cavalry division to move for most of the game thanks to constantly failing their orders (he was hampered by the blunder which knocked the value of his commander down by a point to 7). With the chariots proving to be no threat I was able to advance on to his infantry without the worry of my flank been rolled up. Maybe if I hadn't failed the command to charge my pike Phalanxs into the Indian infantry towards the end of the game I could have secured a victory. As it was with failing my dad moved his infantry out of initiate range so I couldn't ever get a automatic charge into them. Excellent game though :-) 

The battlefield at the conclusion. The Macedonians had made a lot of ground pushing the Indian battle line well back into their half of the table.