Saturday 22 November 2014

French v Austrians battle

With the new arrival of my daughter Aimee in the last couple of weeks my wargaming has come to a understandable standstill so I have taken the opportunity to put the pictures up from our second Napolionic game played abit back while I have a moment from nappy changing and burping.


The game as usual was used using Blackpowder rules pitting my French against my dads Austrians. For this game I had a new Brigade in the shape of four battalions of Old Guard with a 12pdr gun and  attached regiment of guard horse. Also new was a brigade of three Hussairs units. The game ended in a draw but at the end I was just starting to break the Austrian centre as the Guard broke the Austrian Grenadiers. Both our armies lost a brigade each with a couple of other brigades wavering on the brink on each side. Here are the pictures of the action.

French line infantry and Old Guard in attack columns ready to close the distance with the enemy.

The Austrian Grenadiers move forward to face the columns of french after the Austrian line infantry blundered and moved or fled as I put it back towards the table edge. Maybe the sight of such glorious columns put the frightenedrs on them!

My new Hussairs cover the French left wing

The French columns make progress all be it slowly across the open ground, despite failing orders been in a French attack column allows you to make a single move.

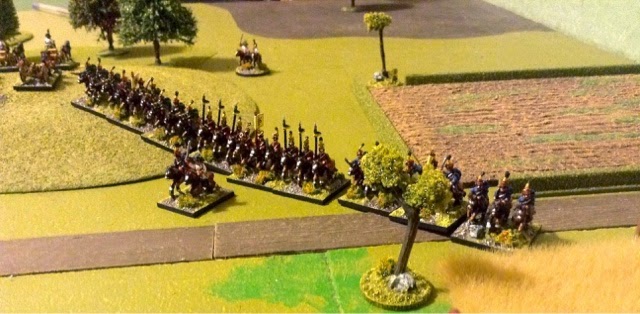
Austrian Ulans and Hussairs sweep around to threaten the French right flank.

Austrian artillery fire round shot into the advancing French columns aiming to disrupt the advance to little effect.

As the French line infantry change formation into lines to engage in a fire fight the French Cuirrasiers move from there hidden position behind the hill to threaten the Austrian infantry. This order I miss judged and ended up moving them far to far and into point blank range of the Austrian infantry..oops 

Although it did look impressive.....

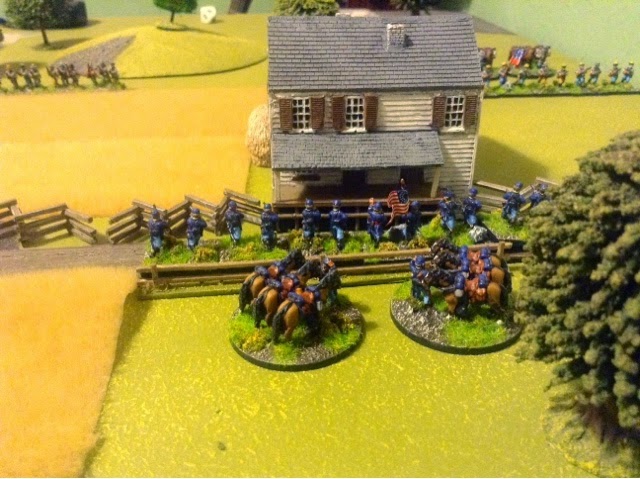
On the right flank the fight for the village starts as the Jäger occupy the buildings the French skirmishes try to flush them out with no joy.

The French Cuirassiers get away with their error as the Austrian musket fire is well poor and cause little in the way of casualties. Seen the French Cuirrasiers makes their Austrian counterparts have a rush of blood and a blunder sees them storm three moves towards the French heavy cavalry.

The massed ranks of infantry engage in a deadly fight for the centre of the battlefield.
The French view,

And the Austrian view
The French Currasiers announce a charge against the infantry who form square so the Currasiers pull back away from the square, who are left to the mercy of the French guns on the hill at short range, the result was the Austrian Square breaking. The Austrian Hussairs were also destroyed by a second unit of Currasiers before reforming back behind the a french line.

After the French line Brigade was broken by the Austrian Grenafiers, the Old guard charged home and after a couple rounds fighting broke the Grenadiers brigade.


With the Austrian centre weakened the French Chasseur a Cheval move into the support of the old Guard brigade.

The Austrian Yager managed to hold onto the buildings as a French attack column failed to drive them out after rounds of fighting. The threat of the Austrian Dragoons forces a unit of French infantry into square as the French right flank comes under increasing pressure although they do have a brigade of Dragoons in support behind the hill. The Austrian light cavalry brigade retreats behind the Austrian infantry lines after been shot at continually by tne French artillery after failing assault the gun position.

The end battlefield with both sides fighting to a stalemate. The French maybe just had the edge after the sucess in the centre of the battlefield.


Tuesday 11 November 2014

Big Tiger in the House

Here is my new addition to my German force for Battlegroup FOTR . The model is manufactured by BattleGroup  minitures, and is the warrior box set Carius. 


I went for the battlefront model as I particularly liked the dismounted crew and ammo carriers you got with the tank. I have only used three of the crew as I didn't want to go over board with the amount of crew standing on the tank, the extra crew will be put to use one day on a scenic base or objective marker.


Im looking forward to this beast been loose on the table top, although I imagine it will attract a lot of attention from any out of fuel/minestrike tokens that might be drawn!


Friday 7 November 2014

4th Century BC India battle


With no game this weekend due to the impending arrival of our second baby girl I have finally got around to putting up the pictures of last weekends game with my dad on to my blog. We ran a Hail Ceaser game using our Macedonian and Indian forces but this time I used my dads Indians for the first time. The game was a straight up battle at 800 points aside.

Indian skirmishes use there javelins to slow the macedonian advance 

Indian infantry ready there bows

The game saw both sides roll blunders in the early stages, half my Indian heavy chariots retired towards my table edge two moves taking a casualty each and my dad saw his Companion cavalry surge to tneir right out of control. Others than this the Macedonians made good progress across the field closing the gap to my Indian infantry lines. The early fighting exchanges were between our skirmish troops who had moved ahead of our main lines.


Indian archers let loose their arrows as the Phalanxs move into charge range

The Greek Hopilites ready themselves as the elephants approach screened by Javlinmen armed skirmishes

After a couple of turns taking fire from the Indian archers The Macedonian Phalanxs stormed into combat, only a couple of units were repulsed by closing fire. My dads Elite Hetairoi blundered on a follow me order and char he'd into a unit of bows on the hill, the following combat was loses and a double one morale throw saw them rout from the table. Unbelievabley the Hypastists also followed suit in rolling really badly in the combat phase and failing on their morale with a double one throw, both elite Macedonian units routed! Along the rest of the line the Indians just about held their ground along tne hill.

The doomed Hetairoi cavalry are beaten by the Indian infantry.

A clash of steel as both battle lines clash in combat

Greek Hopilites engage with the Indian elephants.

After my Indians had initially held the Macedonian pikes in the first rounds of combat my line started to be pushed back, my heavy guard unit failed with the dreaded Double one morale roll, a feat I manged to do on a futher FOUR occasions across my battle line which saw my central infantry division become broken. My infantry division on the right flank of my line managed to beat and destroy two Phalanx's units.

With my Chariots been completely out of the game due to the early blunder it was my elephants on the right Flank that managed to make head way against the Greek Hopilites although close to breaking the Greeks with their Phalanx rule held firm for the remainder of the game.

My Indian line in the centre breaks although it is worth high lighting the Indian bows who were flanked by the Rhomphaia armed Peltasts managed to roll 5 saves of 6 on six dice!


In the last stages of the game I finally managed to get my chariots into a range to charge although they came up short as didn't get the required command roll, taking advantage of this the Macedonian cavalry smashed into my chariots flanks managing to destroying one of them but as a result of becoming disordered in their sweeping advance they were unable to break the remaining chariots.


With this the game was at an end, although the game ended in a draw my Dad was definitely getting the upper hand. The early blunder to my chariot division really hampered my attack as I had great plans for these to smash the Macedonian cavalry and turn onto the Phalanxs flanks. My dad had managed to keep his battle line moving at a pretty good pace so managed to close with my infantry quick enough not to be to disrupted by my massed ranks of Indian bows. Although my Indians fought well the Macedonian infantry is a real tough nut to crack with the Phalanxs special rule meaning even if you win you need to do so by a margin of three or the combat is a draw. Once these troops get amongst your infantry your going to be in trouble, unless of course they are the Hypastists who for some reason despite been elite and stubborn seem to roll a double one and rout when it comes to morale in every game they have played! It was a nice change using the Indians but next time we play hail ceaser I think my dad is going to pit his Chinese against me to see how Alexander's troops fair against them, maybe il leave my elite troops behind for that one 😄

Saturday 1 November 2014

ACW Regimental encounter

Finally I've getting around to updating my blog with last weekends game due to a few late call outs to work. We ran ACW fire and fury game, this time using the Regimental rule set. I decided to use the Union forces and my dad took the Rebs. 


Our units morale and stanima values are rolled for before the game at random, for the best part my troops were trained with the odd green mixed amongst them including my cavalry unit, my guns were crack and all my generals were rated excellent so would confer a +1 to my command rolls. My Dads Rebs had a couple of crack units mixed among them and a few more green than me. The Reb cavalry were crack and the guns were trained, the Rebel commanders were indecisive so would confer a -1 to their command rolls. Our forces started off table although we wrote down were each brigade would enter. The Mansions at each end of the table were classed as objectives as was the church in the middle of the board. Been in control of these has an effect on command rolls of your opponent.

Union troops enter the table and run to secure the church objective and to take control of the centre table.

Rebel forces enter the table in attack lines and head towards the union forces advancing at the centre line

More Union forces enter on the right flank to form a defensive line along the wood line and small farm yard, the troops defending the farm yard were green with a average stanima, the rest of the brigade were trained with one crack of good stanima.

The union troops form behind the fence lines ready to engage in a fire fire fight with the advancing Rebs

The Rebes launch a strong attack against the union right and in particular target the green union regiment holding the farm yard.

The union cavalry beat there opposite number to reaching the mansion on the right and dismount and take control by occupying the building.

The Unions start their own attack on the right next to the mansion headed by a crack regiment, the Rebs take cover in the woods as a fire fight erupts across the fields.

The Rebel forces on the hill start to suffer heavy casualties on the hill in the face of heavy fire from the Union infantry and supporting artillery. 

Across on the right the Union crack regiment supported by a trained regiment make in roads and force the rebel troops in the wood to rout.

Seen the rebel forces taking heavy losses the union troops advance to point blank range on the alert flank. The Rebels on the hill are driven back but the regimentent of rebels in the wood are made of strong stuff and charge and drive back the attacking union regiment back across the crop field.

The Rebels charge into the green union troops holding the farm yard and make short work of driving the unit out in a spent condition.

The momentum starts to swing as the rebel Cavalry drive out the union cavalry from the mansion objective and secure it for themselves.

Spent, low on ammo and at a -1 morale the union regiment is destroyed after the Rebels follow up after driving them from the farm yard.

Around this stage my union forces had suffered enough casualties to pass their break point. Although thus does not end the game it does make you suffer when it comes to your command rolls, at this stage of the game I was at a -4 on the dice roll roll most of my troops, with these factors my entire right flank in the face of Rebs attack collapsed and all but my crack unit who retreated in good order turned tail and fled in dramatic fashion in one command phase, my right flank was finished as a fighting force. 

With my right flank in disarray my Dad started to turn onto my left flank towards my artillery on the hill and attack the churchyard. The Reb attack on the church yard was uncusesful and repelled, but two of the union guns were damaged as the the rebel infantry opened fire upon them.  The union crack guns still held their position though.

Not all was going bad for the union as I managed to break my  Dads right flank, as three regiments of rebels were broken in the attack meaning the Rebs had passed their break point to putting their command roll at a disadvantage. With both armies now struggling with command due to the minuses to the command rolls we had fought each other to a stalemate. Both our right flanks had collapsed and we had suffered almost the same amount of casualties so at this stage we called the game a draw.

The Rebel left flank at the end of the game, only the crack Rebel regiment in the wood remained.

With the union troops in full flight the rebel forces advance to take the ground on the union right.

A rip roaring game played to a bloody standstill. The collapse of my right flank was dramatic and really captured the feel of the rules.  Overall I really enjoyed using the regimental version of fire and fury.