Monday 22 December 2014

A little something new....


Well the latest project has quickly come about as we decided to explore a new theatre in WW2.
All Ready with expansive forces in the European theatre of war ranging from Kursk and Normandy through to the Fall of the Reich in 15mm we decided to turn our attention away from these theatres to the war in North Africa in the year1942/43 although this time in 10mm using Blitzkrieg commander rules. My dad had recently ran a game with Robbie at a local show using Robbies beautiful 15mm British/italian collection using Blitzkrieg commander and this had wet his appetite to have a crack at gaming this period. We decided to go with Rommels DAK army group as the opponents for Montys desert Rats as as mentioned Robbie already has the Italian army covered. All the models featured in the two armies are from Pendrakens 10mm range.

Monty and Rommel in there matching transports. (Rommel stole his)

So with more than enough figures and more importantly tanks painted we ran a trial game at the weekend to help get me up to speed with the rules as I've only had a couple of games a while back fighting Normandy games. So with a sand coloured sheet purchased and some Palm trees and buildings we played a game with me taking control of the British attacking a small settlement held by a small German force who were to be reinforced with Rommels Panzers. Rather than write a blow for blow account of the game I have just added some pictures of the action seen as though it was more a trial and error game. What I can say was in the short time we did play there was plenty of action, tank duels and the customary BLUNDERS!

Matilda and Grant tanks with a 6pdr A/T gun

A German Grenadier platoon supported by Marder III tank hunters and Pak 38 A/T guns

British Cruisaders with infantry in support and a boffers A/A gun

A Stukka dive bomber swoops in on the Matilda's

Panzer III tanks join the defense of the buildings


More Crusaders join in the attack as a universal recce team scouts out the German positions.

British Honeys prove no match for the Panzer III's 


The arrival of a Hurricance fighter plane evens up the fire fight

The British advance under the cover of smoke from a pre programmed barrage.

Panzer II's swarm over the hill to engage the Matilda's 

The Attack on the German settlement entensefies

The result of a tank fire fight in the desert, smoking tanks everywhere!

British infantry make a belated rush to assault the German defenders under air cover

The final positions on the battlefield 

The game played great and was completely different to our usual WW2 games, there is definitely no place to hide in the desert with your tanks so it led to a much more open game as opposed to the cat and mouse games you become involved in the Normandy theatre especially. The rules I felt were a perfect fit for this area of the war, I think maybe I enjoyed them more this time as they have a feel of Blackpowder about them, (which I have been gaming quite abit lately) with command rolls been required to activate your units and so on. One thing we did take from this game though was we will need to purchase some more smoke markers, 12 burning tanks in total during this game which we didn't even have time to finish :)

Tuesday 16 December 2014

Capture the British Camp. A Crimean Battle

Today we headed up to Colin's for a afternoon game using his British, Turkish and Russian Crimea forces to have a good old Blackpowder scrap. It was my first visit to Colin's since he has completed the work on his new Wargames room and it looked very nice indeed. This was my first time fighting this period So I took command of the Russian forces tasked with over running the British/Turkish camp along with Collin and my Dad took charge of the British/Turkish force charged with keeping the Russian forces at bay for as long as possible, each turn would see the allied defenders reinforced by the British infantry who were marching to the camps aid. We rolled for our generals, my rolls saw my 2 foot brigades of Russian infantry have a command value of 6 and my cavalry a 7, movement looked like it could be slow going. Colin's troops were command values of 6's and 7's throughout and the Allied forces for the best part were 8's apart from the highland brigade who were a 9. The British c-c was a 7. My force was tasked with attacking across the Middle of the table over a small river and Colin's command would launch their attack from the left hand table edge, attacking the Turkish troops who had deployed in the redoubt area. My Dad deployed two British rifle units on the two hills infront of the camp and on the far left of the British was the Heavy cavalry brigade. 3 brigades of British infantry would be arriving via any place along the British table edge though in what order would would be determined by a dice roll. So with that the Russians launched their lightning quick attack before the main British infantry could arrive...... Yeah right, our Russian force sauntered onto the table, with one move only, one battery of mine stayed off table as did Colin's brigade of Cosacks and Ulans who were to eventually arrive later in the game. One of Colin's infantry brigades however wasted no time in advancing full moves towards the Turkish defenders. I did learn a harsh lesson in the first turn mind when I sent a battery of guns up the road and over the bridge only to be charged by a unit of Dragoons and destroyed while still limbered! I'm used to playing Blackpowder in 15mm so we use centimetres, 2 moves (36inches) covers alot longer distance in this scale oops, lesson learned!


My Russian March columns entering the table at a slow march, most of mine and Colin's Russians made slow progress across the battlefield.

The Russian infantry storm towards the Turkish defenders as the first shots of the game are fired. This area of the battlefield was to see a major tussle as the Russians attacked the redoubt and over many turns of bloody hand to hand combat the Turkish defenders repelled the attack holding their ground heroically while awaiting the British reinforcements.

After a few turns of very slow going from my Russian infantry my Brigade commander suddenly remembered what he was there for and got the whole infantry brigade to move 3 moves pushing them up to hill. The British riflemen who by this time were supported by a reinforcing battalion of British guard infantry evaded the charge and left the guardsmen to deal with the oncoming Russian horde.

The Brithish guards in line formation strengthen the allied centre as more reinforcements arrive in the form of the Highland brigade. With this arrival I ordered my second brigade to charge the guards, Blunder!! One Russian Battalion charged forward one move right into canister range...the result the following turn was one Russian battalion becoming shaken. Colin kindly tried to help these poor Russian infantry with a charge against the artillery with the Cossack cavalry who suffered a even worse fate and routed as result of the closing fire.

A penny for my dads thoughts as he looks on to the massive Russian attack on his right flank. Thè Turkish infantry were still holding after seen two battalions of Russians sent packing but they now found themselves shaken and under attack from fresh infantry. The Highlanders sent 2 battalions to reinforce the flank as the Turkish lancers managed to rout a Russian infantry battalion who had hastily formed square, but been shaken the lances smashed home and broke the square. With glory still fresh in their veins the lances sweeping advanced into the supporting Russian attack column only to find themselves well beaten in the pursuing combat leaving my dad wishing he had pulled the back after their original sucess.

Seen the loss of there fellow comrades 2 battalions of Russian attack columns charged into the Guard unit. After 3 or 4 turns of H/H combat the guards were defeated and forced to retreat shaken, one of my Russian battalions was broken in the combat and the Brigade commander was killed in action to.

All my infantry were now committed to melee were, on the hill another unit of Guards was eventually worn down and routed meaning the Guards brigade was finally broken. The British camp was now insight all tough it was now defended by tne British line infantry and riflemen.

I had to take this picture of Colllins Lancers as when they finally did arrive onto the battlefield they refused to move and take any part in battle! They did arrive well dressed though it has to be said.

Colin and my dad in the thick of the action, before this game they both had dark sets of hair, honestly 😉

Back over to the British right and the Russian infantry were now in melee with the highlanders after pushing back the shaken Turkish infantry. After a couple of rounds of stalemates the Russian Batallion was finally broken when the Turkish infantry charged from the Redoubt and into the flank of the Russian infantry tipping the balance of the combat. The fight for the redoubt was about to come to a conclusion...

Back in the centre the British infantry held firm in the valley against the advancing Russian attack column who became disordered and found themselves at the mercy of the British rifles.

Finally the redoubt fell and the Russian infantry took the position as the Turkish brigade was finally broken and there artillery over run. However it had come at a cost as a Russian brigade was also lost in the assault.

The British riflemen desperately hold onto the camp as the Russian infantry get to with in touching distance after breaking the Guards. However this was as close as they were to get as the Russian brigade caught in the valley were about to be routed.....

With time just about up I made one final charge with a follow me order into the British line infantry to try and break there hold on the camp. Despite a bitter struggle my Russians were routed taking there supporting unit with them. With this my attack had collapsed and my whole right flank was now broken meaning the infantry on the hill in front of the British camp would now have start to withdraw. In the British final turn a unit of Dragoons who had been getting shot away at off my horse artillery managed to charge and break a unit of my lancers but they themselves had become shaken in the process, meaning both sets of cavalry brigades were one unit from been broken.

The British troops cheering as the Russians flee after their defeat in the hand to hand combat! With this time had ran out and the game had come to an end. Both armies had lost 2 brigades at this point and both sides were very close to losing further brigades.

The battle turned out to be a really tough hard slog for both sides. In the later stages of the game I thought I had the Britsh on the brink when the Guards finally broke but a quite spectacular round of morale saw my right flank collapse. Up to that stage my Saving throws had helped me gain the upper hand along with some quite poor British shooting, but the British held firm to just edge the game with a minor victory as they still held the camp. Collins attack onto the the Turkish troops had been a bitter struggle and they took some shifting out of the fortifications, when they finally did break the highlanders brigade had arrived and strengthened my dads British right flank. If the Turkish infantry had failed one or two morale throws earlier in the game I fear that the British flank would have been rolled up and with my attack pushing hard in the centre the camp would have been captured. I Really enjoyed the game and thanks again to Collin for the invite and putting the game on.


Saturday 13 December 2014

Guildford Courthouse

                                              " GUILFORD COURTHOUSE 
                                     North Carolina 15th March 1781

Last weekend we re fought Guilford court house using the scenario and army lists from the Blackpowder AWI supplement Rebellion. I took the roll as Lieutenant General Earl Cornwallis leading the crown forces against my dad who took the role as Major General Nathanael Greene leading the rebel forces 

The deployment looking up the table from the British table edge.

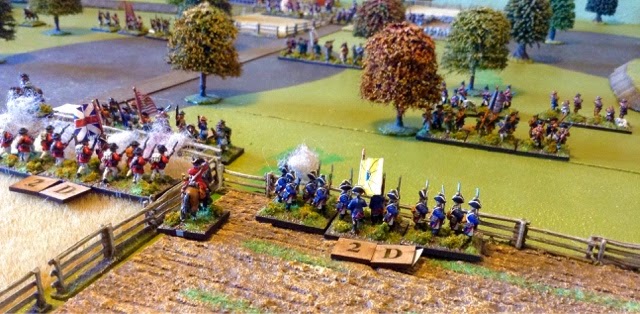
The British force confronted by the Rebel forces.

The opening moves saw the first sucess go towards the British as a unit of North Carolina Militia broke due to their wavering special rule after a couple of volleys from the British muskets. A second unit of militia were shaken and retreated back towards the wood line from the superior Hessian shooting. The only real negative for the Crown forces was O'Hara's brigade blundering and retreating off the board... And they call themselves Guardsmen!

The militia are not to keen to stand and trade musket fire with the British infantry and hessian Jagers

After a couple rounds of firing the British fix baynots, overcoming the closing fire to charge into the militia lines.

After a round of hand to hand combat the British won with some ease due to their ferocious charge ruling and with that General Eaton and Butlers North Carolina division was broken, the British pushed over the fencing and headed into the woods where Lawsons and Stevens brigades awaited.


Websters brigade push deep into the tree lines and start to push the rebel second line back though on the rightLesies brigade find the awaiting Stevens Brigade of Virginia militia and riflemen a much tougher nut to crack, especially with Lees legion Cavalry ( light Dragoons ) who manage to flank and hold two British Guardsmen for a couple of vital turns  slowing the British advance.

After breaking the second Rebel brigade as Lawsons brigade was broken in the wood by Webster  I had to commit Websters brigade onto the continentals on the hill line unsupported as my right flank had stalled. I issued a follow me order onto the 23rd foot and charged into the 4th Virginia veteran Continentals supported by the guards light infantry. Despite winning the round of combat the Continenals stood firm due to the steady rule they benefited from, in the following round with the loss of ferocious charge the British 23rdwere broken and Webster was killed in action. With the 33rd British foot infantry becoming shaken in a fire fight and my rather foolishly charging a medium artillery piece with my Dragoons and seen them break Websters brigade was broken and started to retreat back through the woods. The Rebel right flank had been victorious and held.

The desperate fight between the British 23rd foot and the 4th Virginia continentals for the hill, if the British could break this position they would win the game. 

But Alas they don't and instead are driven back shaken and disordered and pretty much spent.

With the British left flank attack over it came down to the British guards to try and win the day and they finally advanced Further into the wooded area after finally repelling the rebel cavalry. Stevens Virginia militia awaited the advance and despite the British first fire volleys they held there ground and readied themselves for the charge. Once again the time they held this ground allowed the continentals in the 3rd Rebel line to advance up to support.  

Lees Light Dragoons showed their worth again this time charging a massive three move charge thanks to a follow me order, flanking the Hessian  Reg't Von Bose infantry who had been on the losing side with a fire fight with the Virginia riflemen and lees veteran line infantry since early in the game  continually becoming disordered.

The 33rd infantry of Websters brigade come under heavy fire from the 2nd Maryland continentals and Singletons artillery and find themselves quickly becoming shaken and retreating.

Websters brigade starts to withdraw in the face of heavy musketry fire from the continentals 

Lees Dragoons led by General Edward Stevens break and ride down the Hessian infantry confirming their unit of the match status.

After finally shaking the Virginia militia and driving them back the guards of O Hara's brigade made one final charge against the 1st Maryland veteran continentals who had just rallied the previous turn with the help of Colonel Williams and their supporting artillery. In the following combat the artillery was overrun but the Guards 1st and 2nd Battalions came up short due to some rather impressive Rebel saving. Both guard units had become shaken and were forced to with draw meaning the British attack was now over, however In the combat they had managed to kill Colonel Otho Williams .


The final position at I think what was move 14. My attack had now stalled and it was time for Cornwallis to sound the withdrawal of his remaining troops. Both armies had lost 2 brigades each and both were very close to losing a third which would have won the game for either side. The final line of Americans proved one step to far for the British forces. After a storming start breaking the first line of militia with little in the way of casualties I found the second line a little tougher due to the cover of the woods. Unfortunately the early blunder from O' Haras guard brigade deprived me of these infantry for to much of the game, if I could of used these to support Websters attack on the Virginia continentals on the hill I possibly could have swung the the game in my favour. I thought as did my dad that it was a cracking game, really back and forth with some heroic fighting from certain units for example Lees Light Dragoons were a major thorn in my side and despite eventually fallen victim to these cavalry the Hessian troops passed more break tests than I care to remember!  the scenario was really enjoyable and definitely something I would like to play again maybe next time been tasked with the command of the Americans.

The final position