Friday, 2 June 2017

Another try at Pickets charge....

Last weekend we had another go at fighting a ACW game using pickets charge rules, this time without a couple of rule errors around the command phase which we had done wrong in our previous game. Once again I can only but commend the rules on what turned out to be a cracking game, there was plenty of highs and lows for both sides and in the later stages of the game It looked like I might be defeated using the Rebs as my Texan brigade began to fold like a pack of cards. However I managed to get them to steady there lines just as it looked like they were about to flee the battlefield and fight my way back in the game as the union left flank eventually started to withdraw after some heavy fighting. A stalemate result in the end but this game was anything but a bore draw. I particularly like the command phase and with some clever use of your staff officers you can really dictate how the battle will be fought, that is however if you can get them to deliver their orders which is not always the case ha ha. Pickets charge are definetly a set of rules which you should explore if you are a ACW wargamer, it gives a great feel for the period your fighting and despite the Rulebook being quite daunting when you turn the front page the game is reasonably easy to play. Here are a few photos of the game, this weekend will hopefully see us fighting a WW2 game to give my Russians and Germans a run out..

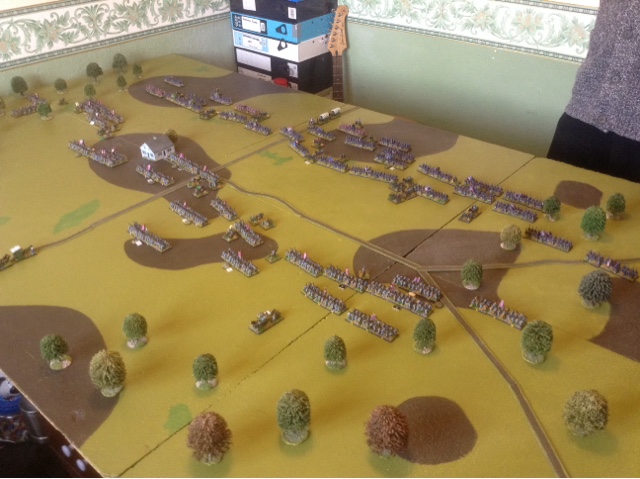
The battlefield at set up

The far right hand Reb brigade took a few turns to get their orders through and into the actionรด
The Rebel attack on the Union held hill on the Right flank
The thin Rebel line in the centre facing the out numbering Union troops who have just received support from the reserve brigade ,as the Reb reserves become hesitant just as they are needed.
The Texans start to give ground as the Union Irish  brigade push onto the taken ground after out manouver ing the Rebs
The Union troops holding their left flank start to falter and start to retreat away from the hill
The battlefield in the thick of the action
The Union pressure proves to much as a Texan regiment are routed as the brigade starts to falter and retreat 
Desperately the Rebel reserves try to strengthen the central brigade late in the day
Having taken the high ground the rebels consolidate their position
Although faltering and retreating for a couple of turns the Texans manage to rally up and get ready for one last stand against the Irish brigade who have now pushed far into rebel territory 
The final union defenders abandon there position on the hill as they become "tuckered out" after a fierce fire fight with the attacking Reb forces just left of centre on the battle field
Both union and rebel reserves arrived on same table edge and quickly became involved in a desperate fire fight around the wooded area
The Reb reserve brigade at the double 
The highly rated Reb General watches his army steady the battleline


Friday, 19 May 2017

Well that was short and sweet....

We ran a game of Blucher last weekend and it turned into a complete disaster for my French army as I was comprehensively beaten in a record time. My full on attack for the objectives back fired spectacularly and just after really an hours game time the game was over for the French as my brigades had been shot to pieces with very little in the way of casualties on the Austrains side. It wasn't my finest hour of wargaming tactics I must admit but when my dad rolled 5 dice and 4 rolled a six with his first artillery shot of the game which saw my lead brigade of the 1st Corp finished as a fighting unit I got the feeling it might just be one of those days! I was far to rash in attack and committed far to many troops across to vast a frontage to give myself any chance of winning, Still despite the heavy defeat I enjoyed using the rules again after alittle absence from them and I am already plotting revenge the next time I encounter the Austrains. Here are some photos of what action their was ๐Ÿ˜„
One bonus  was that my Saxon corp preformed exceptionally well and held the town for the time we played
The large Cavalry attack launched by the Austrains
Austrain infantry caught unprepared by some marauderingFrench hussars 
The French Dragoons try to with stand the Austrain cavalry onslaught 
The last attempt to swing the tide as the French Currasiers are committed

My favourite artillery unit, I love the uniforms of these Saxons 


Saturday, 13 May 2017

New rules for our ACW games??.......

Last weekend I played my first game of my dads latest rule set addition for ACW , Pickets Charge. I must admit I was alittle daunted at first as we have been juggling around with a fair few rule sets for this period and there was a feeling of 'oh no not again' and after my dad briefly ran through the rules it felt a lot to take in. However these fears were quickly dismissed after a few turns and I quickly adapted  to the rules and the game mechanics, which I have to say are very very good. The game flowed at a decent pace with just the odd reference to the rules as my dad himself is just getting to grips with them, even by the last hour of the game I was already remembering scores required on the dice to hit and factors etc. 

The 'old lags' holding the union left
The Texan Brigade on the March 
Heavy Fire fighting over the cropped fields
The command phase works very well, it almost had a feel of Blucher about it and on more than one occasion I was left with none to many staff offices to carry out the orders, really making you think had about how exactly you use your orders and where to focus your attack or defence. There is also the seeing the elephant rule and the (for short as I can't remember the full name) 'Dipity' test which as I found out much to my horror can have a devasting effect on your troops which really add a nice touch to the game, in one example a regiment my dads green Rebs really excelled in their round of firing and found themselves under the belief they were now a crack unit gaining the benefits from this rule. Elite troops worked well with their extra shooting dice and better morale but importantly they weren't  battle winners on their own as sometimes I have found with other rule sets can happen when they are given to many 'special rules'.
The Rebs form a defence line along the picket fencing
The Texan brigade in the thick of the action against the iron brigade
The union line faltering under pressure from the Rebs
So all in all I liked everything about these rules, possibly I might have found the sniper team to be a little to effective but you don't mind when it's working for you ๐Ÿ˜„. Our game although a trial game was definetly tilting in favour of my dads Rebs as we drew to a close of play as my staff office dice started to desert me at a crucial time in the game really putting me on the back foot. I have very kindly been bought a set of the rules which over the course of the weekend I will be having a good read through so there will be no excuses next time out...
The final picture is of this lovely little train my dad purchased from eBay which makes a nice addition to the scenery of the game...all aboard.....

Saturday, 8 April 2017

A little bit of kings of war action as the undead arrive......

Our last game saw a fantasy clash and a first outing using Kings of War for my undead army. They were opposed by my dads dwarf army in a straight up pitched battle which as can be expected from this rule set was a pretty brutal affair with lots and lots of destroyed units. Neither side could quite get the victory in the time we had but it was a mighty close game and a draw was a fair reflection of the action. The undead faired pretty strongly, they are slow to get into the action which they are in other rule sets , which can be frustrating but once they reach the enemy they can be very durable in melee and have some good units which can be very hard hitting. The game was was a nice change from the norm and next time we are going to try one of the scenarios in the kings of war book to add a tactical element to the game. Here are some photos of the action....

The set up
Undead catapult looks to launch its screaming skulls among the massed ranks of dwarfs
The dwarf elite body guard and organ gun
Troll slayers await their doom along side the rock elements
The over eager  werewolves try to swarm the steam tank for reasons they only know and pay the price as the trollslayers and dwarf cavalry (yep cavalry) counter charge with devastating effect
These dwarfs cavalry fair less well against the might of the blood knights and supporting undead cavalry
The troll slayers fresh from victory over the werewolves charge into the massed phalanx of undead Spearmen along side the rock elements as the stream tank stumbles foward into to the unfortunate Gouls 
The hard hitting Wrights prove more than a match for the rock elements
The undead  finally reach the dwarf battleline as the wraiths and soul readers charge Home
The lumbering zombie leigion finally overruns the flame belcher as the trollslayers finally have the chance to unleash their rage and meet their doom as the mummies enter the scene
The dwarf horde struggles to hold the wraiths and vampire Lord at bay
The Dwarf Lord charges in to inspire his shild bearers to glory
The rock elements are completely surrounded as the undead magic surges the mummies foward
Although they die easily a(for a second time ๐Ÿ˜„) the massed ranks of zombies pins down the trollslayers and dwarf horde for a number of turns
As do the rock elements who are quite literally chipped away at by the surrounding undead units
The remains of the dwarf army become surrounded in the centre as the vampire and dwarf lords battle each other in a challenge
The end of the game, with a lot less troops on than when we started ๐Ÿ˜„

Monday, 3 April 2017

Salem Church 1863


Time has been sparse at the moment due to a multitude of things so I have fallen behind in keeping my blog updated, so before I watch the last episode of the walking dead I have made myself a cuppa and with Robert plant live playing away on the sky box I am going to write up a quick report of the ACW game my dad and I played a couple of weeks ago. As the post title says we fought the battle at Salems church 1863 taken from the Blackpowder supplement Glory Hallelujah and of course using Blackpowder rules. We used the troops my dad has available so for the eagle eyed amongst my readers the Irish and Texans weren't present at the battle on the day but to make up numbers they would be this time, but obviously they were to be treated as regular infantry. Always one to be a sucker for punishment I decided to use the Confederates, with my first division been exhausted and only able to make one move a turn and been outnumbered by the union this would prove to be a tough ask. The game lasts for seven turns with the winner been the side who can inflict the casualties onto the other side 
 

How the armies looked on deployment, another division was to enter play on the unions first turn central behind the union centre. The wooded area on either flank would only allow a single move at half speed per turn, I put one of my exhausted brigades in the woods on my left flank hoping that I maybe able to outflank the union line.

My out flanking plan didn't quite materialise as a result of failed command rolls, a blunder and the half speed movement, they did become involved late in the game but 2 regiments from the brigade failed to get into the action, in hindsight I had wasted these troops.
The church in the centre of the battlefield was about as far as either of our lines got to each other as over the course of the seven turns the game lasted this open ground became a killing field in a deadly fire fight which proved costly to both sides
My reserve brigade from the second division, the plans were to wait till the fire fight had begun with the front line troops and reenforcements the line were needed, however as the next photo will demonstrate they were quickly needed else where on only move two of the game.
Yep a BLUNDER! The divisional commander cocked up big style and sent a full four regiments back two moves away from the front line leaving a colossal hole in my battleline, with my dads eyes lighting up at the prospect of the mayhem he could cause due to this action I had little choice but to commit my reserves to plug the gap, so much for plan A!

The fire fight rages across the battlefield

By the half way point it was clear that neither my dad or or I were going to be able to push home any advantage we thought we might have as both our front line troops were pretty shot up, this battle was turning into a battle of nutrition and who had the bigger balls to stand the longest under the heavy fire we were both receiving 

My first brigade of the 2nd division returns back to the front line to lend its support in the fire fight. I was unable or should I say reluctant to advance past this point as my dad had brought up the union artilley to cover his now retreating front line,  My rebs had already been shot up in the previous fire fight with the retiring union infantry brigade so to say the sight of them double gunned batteries was off putting has to be something of a under statement  ๐Ÿ˜„

The fighting round the church briefly swung in my favour as the front line union brigade was broken, but unfortunately for me before I could press home my advantage my dads whipped troops remained were they were with a number of sucessful morale rolls and in turn broke my leading rebel brigade, this pretty much rendered this side of the battle a stalemate.

A second union brigade is broken but there was another full strength brigade ready to deploy in its place, however with only one turn remaining as was now 2-1 up on broken brigades, victory was in sight................
........But alas not to be as a second brigade broke under some withering fire from the boys in blue and by the end of turn seven both our armies had suffered the same number of broken brigades declaring it a draw.

This game turned out to be a desperate fire fight meaning it was a tough call for either side to claim a victory but more so I feel for the rebels, the way the battlefield is with the woods on either side led to our troops getting bottle necked into fighting through the centre as it would done in the real battle on that day back in 1863. It was still another cracking game from a period which is taking to me more and more each time I play it and definetly using the Glory hallelujah supplement helps to give a solid period fell to the game IMHO.