Showing posts with label Fire and Fury. Show all posts

Saturday, 1 November 2014

ACW Regimental encounter

Finally I've getting around to updating my blog with last weekends game due to a few late call outs to work. We ran ACW fire and fury game, this time using the Regimental rule set. I decided to use the Union forces and my dad took the Rebs. 


Our units morale and stanima values are rolled for before the game at random, for the best part my troops were trained with the odd green mixed amongst them including my cavalry unit, my guns were crack and all my generals were rated excellent so would confer a +1 to my command rolls. My Dads Rebs had a couple of crack units mixed among them and a few more green than me. The Reb cavalry were crack and the guns were trained, the Rebel commanders were indecisive so would confer a -1 to their command rolls. Our forces started off table although we wrote down were each brigade would enter. The Mansions at each end of the table were classed as objectives as was the church in the middle of the board. Been in control of these has an effect on command rolls of your opponent.

Union troops enter the table and run to secure the church objective and to take control of the centre table.

Rebel forces enter the table in attack lines and head towards the union forces advancing at the centre line

More Union forces enter on the right flank to form a defensive line along the wood line and small farm yard, the troops defending the farm yard were green with a average stanima, the rest of the brigade were trained with one crack of good stanima.

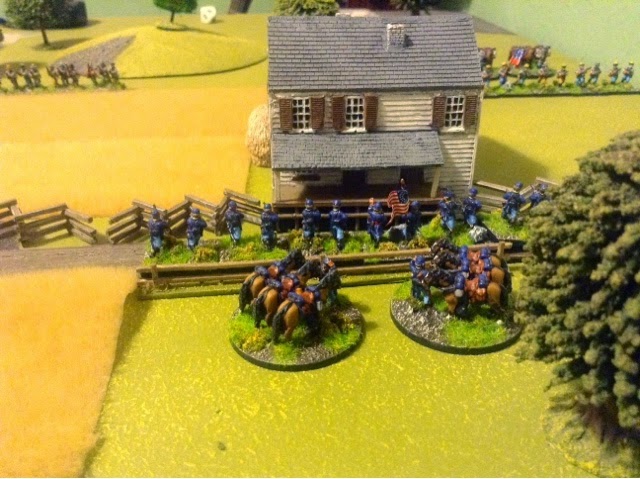
The union troops form behind the fence lines ready to engage in a fire fire fight with the advancing Rebs

The Rebes launch a strong attack against the union right and in particular target the green union regiment holding the farm yard.

The union cavalry beat there opposite number to reaching the mansion on the right and dismount and take control by occupying the building.

The Unions start their own attack on the right next to the mansion headed by a crack regiment, the Rebs take cover in the woods as a fire fight erupts across the fields.

The Rebel forces on the hill start to suffer heavy casualties on the hill in the face of heavy fire from the Union infantry and supporting artillery. 

Across on the right the Union crack regiment supported by a trained regiment make in roads and force the rebel troops in the wood to rout.

Seen the rebel forces taking heavy losses the union troops advance to point blank range on the alert flank. The Rebels on the hill are driven back but the regimentent of rebels in the wood are made of strong stuff and charge and drive back the attacking union regiment back across the crop field.

The Rebels charge into the green union troops holding the farm yard and make short work of driving the unit out in a spent condition.

The momentum starts to swing as the rebel Cavalry drive out the union cavalry from the mansion objective and secure it for themselves.

Spent, low on ammo and at a -1 morale the union regiment is destroyed after the Rebels follow up after driving them from the farm yard.

Around this stage my union forces had suffered enough casualties to pass their break point. Although thus does not end the game it does make you suffer when it comes to your command rolls, at this stage of the game I was at a -4 on the dice roll roll most of my troops, with these factors my entire right flank in the face of Rebs attack collapsed and all but my crack unit who retreated in good order turned tail and fled in dramatic fashion in one command phase, my right flank was finished as a fighting force. 

With my right flank in disarray my Dad started to turn onto my left flank towards my artillery on the hill and attack the churchyard. The Reb attack on the church yard was uncusesful and repelled, but two of the union guns were damaged as the the rebel infantry opened fire upon them.  The union crack guns still held their position though.

Not all was going bad for the union as I managed to break my  Dads right flank, as three regiments of rebels were broken in the attack meaning the Rebs had passed their break point to putting their command roll at a disadvantage. With both armies now struggling with command due to the minuses to the command rolls we had fought each other to a stalemate. Both our right flanks had collapsed and we had suffered almost the same amount of casualties so at this stage we called the game a draw.

The Rebel left flank at the end of the game, only the crack Rebel regiment in the wood remained.

With the union troops in full flight the rebel forces advance to take the ground on the union right.

A rip roaring game played to a bloody standstill. The collapse of my right flank was dramatic and really captured the feel of the rules.  Overall I really enjoyed using the regimental version of fire and fury.

Saturday, 7 June 2014

ACW Encounter

I've had a week off work so we ran a afternoon ACW Fire and Fury game during mid week. The confederates started the game with one division on the table and three in reserve, the Union would start with all their 4 divisions entering from the table edge. All over the battlefield the major hills and buildings if controlled would be added to your final victory points, claiming objectives in your opponents half of the table would be higher in victory points. I took control of the Confederates and rolled on the events chart, rolling a 1 meant that my first division would be stuck in camp until I could roll a 9 or 10 (d10) meaning possibly they might not turn up at all. The Union roll saw them gain a captured gun for their force.

I deployed my first division across the center of the battlefield in the fields and across the hills of the valley, from turn 2 my second division entered from the right side of the table and my cavalry on the left as this was hampered with difficult terrain, so I planned to dismount in the rocky areas and at least slow the advance of the union right flank and maybe gain an objective. My final division of infantry who are delayed were supposed to enter in the center, so it was vitally important they entered sooner rather than later or the Union forces would overwealm my center in very little time.


Lucky for me my delayed division arrived on my very first roll and they wasted no time in running in column up the road to reinforce the thinned out Rebel center.


The Union troops advance in good order towards the rebel centre and the Valley.
 

Pickets division arrive on the right flank at the start of turn 2 pushing forward to meet he Union forces heading for the large hill.


The Unions start their main attack against the valley, committing 4 brigades against the Reb forces on the hill tops. A secondary attack goes against the field on the Rebel left centre.


The Union right flank under harassing Rebel artillery fire stumbles forward towards the farm houses.
My Dad also amasses a large amount of guns on the hill in support of the Union attack.


The first charge of the game sees the Union charge the hill, my Reb troops unleashed a deadly first volley but as a result they became low on ammo meaning my troops firing factors drop by half. The superior numbered union troops took full advantage of the situation and shook off their disorder and charged home.


Both Reb brigades were comprehensively beaten and forced to retreat well back from the hill, one brigade spent and the other worn. The Union troops took the ground just in front of the Rebel reserves at the church.


Seen the right hand side of the centre start to fall back I decided to launch a strong attack at my dads centre. Despite having a massive 17 factor because of the batteries on the hills behind supporting fire my dad rolled up a one so my elite Rebel brigades charged into combat unharmed.


The Rebels in the field had weathered the fire they had come under and with reinforcements now in support they advanced out the field to put more pressure on the Union centre.


The Union guns ready themselves as the rebels advance out the fields towards the union centre right.


A Union brigade breaks from combat in the centre and retreats back behind a hill, the over running rebel forces push towards the guns on the hill, staying out of canister range.


In the centre around the church both sides engage in a fierce fire fight


On my right centre to the right of the church one of my brigades somewhat surprisingly is broken and retreats away from the breaking through Union troops who's sweeping  advance takes them into my already battered brigade breaking them in the process to. The church was now held by only really one full strength brigade.


The Rebs charge out of the field into the union troops. The unions defending the wood hold their ground and repulse the Rebs, the second charge has better success as the union troops had already become low on ammo and are worn, the Rebs pushed the union back and took their ground.


On the union left flank my dad had managed to out flank Picketts division and had taken the high ground and had been unleashing fire down the Confederates flank with damaging effect until they became low on ammo. At this point I managed to rally the disorder from my supporting unit and charged through the disordered unit to get into combat with the iron brigade who had been taking heavy casualties during the game. I managed to push the iron brigade back and my brigades quickly took the ground and headed towards the buildings in the union deployment zone.
 

My sole brigade at the church takes the opportunity of charging a union brigade in the rear and breaking them, they followed this by sweeping advancing across the valley into a second union brigade but they ran out of steam and were repulsed, unable to reclaim the valley.


The union troops had taken control of the stone wall field to the Confederates left centre, in a final desperate charge the Rebs charged across the field but the union brigade fought well and with the defence of stone wall they pushed the Rebs back.


In the centre my conferate 2 nd division had taken full control and pushed the remaining union brigade back to their own base line. However they failed to reach with their final charge and only managed to contest the hill objective in the union centre.


Having repulsed the final confederate charge the Union brigades consolidate on top of the valley, the opposing confederate brigade worn and low on ammo retires back to the hold the church objective.
 

On the Union left Pickets division had stormed over the fields to take over the manor house objective as the Iron brigade retreated, the remaining Union brigade remained in control of the high hill objective on the left.

The final positions of the remaining troops. My Dad was in control of his right wing and held the farm house objectives, the Centre belonged to me as my division had broken through the Union troops and the Union left was a mixture of fortunes as both our forces had made ground and claimed objectives in each others deployment zone. It must be noted that at this point my Confederates had reached their army break point so my army was classed as worn and any future turns would have seen my command rolls at a minus one. Most of my brigades were now worn or spent and my dad although suffering heavy casualties to had a whole division still on the right wing basically at full strength. We totalled all our victory points for casualties/broken Divisions/KIA exceptional leaders and objectives and we found that we had both scored an equal mount of 26 points each.
Result draw...
I think this was a fair result in the end, up to the middle part of the game it really did look like my Dads Unions were going to turn me over, he had good success over the valley and my troops paid a high price, however a few strong charges in the centre helped swing the game back in the balance and despite some desperate last charges on both sides the game finished in a very enjoyable draw.


Monday, 5 May 2014

ACW Head on clash

My Dad has been busy rebasing and reorganising his ACW armies as he has decided to use Fire and Fury rules again after not quite been won over from the last rules he had adapted. He was keen to get them on the table top so at the weekend we had a straight up battle using them. I can vaguely remember using Fire and Fury what seems a lot of years ago but not the game mechanics. 


I used the Unions for a change and my dad took control of the Rebs. We managed to get several turns in during the course of the evening without much reference to the rule book and I picked up the rules quickly during the game after a quick briefing from my dad.
When we called an end to the game my dads confederates were beginning to break through, my left flank had started to collapse and although I did have success on the left of the centre my right centre had taking abit of a pasting when the confederates got into melee. My right flank had repelled the confederate attacks and was holding reasonably well. We did a quick points tally gained for destroyed/spent/wavering units and killed generals and my dad held the advantage 15-7 taking the victory.
Here are some pictures of the action,

The two armies start to close to each other

Union troops ready themselves for the advancing cavalry 
The union troops first volley across the corn fields
The Iron brigade in attack column charge but despite the bonus to hand to hand combat from the random event chart at the beginning of the game they fail to make any impact and are repulsed easily.
Union troops advance up the hill in the face of deadly Rebel fire.
The Confederates attack the church yard.
Union cavalry reinforce the wavering union centre
The Rebs attack the union right flank defending the woods, their random roll on the chart had seen this division on a minus to shooting due to wet powder.
The Union left starts to break as the pursuing rebels come under close range cannon fire
The depleted Iron brigade break  and retreat further through the cornfield as the greater numbers of confederates over realms them in melee 
The Union dismounted cavarly are forced to withdraw from the woods
The confederates attack is repulsed on the Union right
The union centre rallies and readies itself for the confederate second charge.